
Desserts
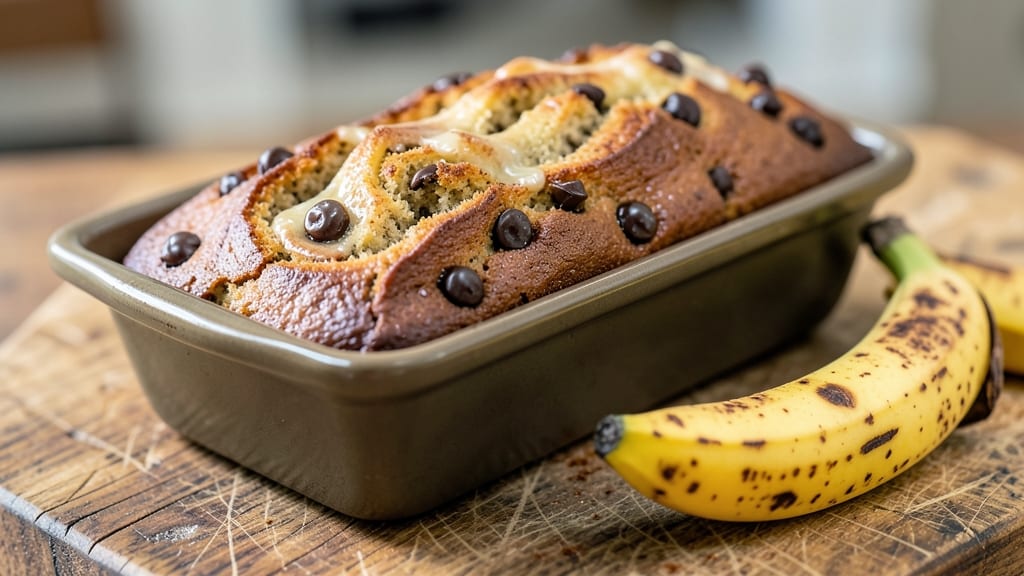
This afterschool banana bread recipe transforms overripe bananas into a moist, swirled loaf that smells like nostalgia and tastes like comfort. 💛 The secret lies in a simple vanilla swirl that cuts through the dense banana batter, creating pockets of warm, fragrant magic with every bite.
Perfect for hungry kids (or adults) after school, this recipe requires just one bowl and 30 minutes—no fancy techniques, no stress. What sets this apart is the texture: tender crumb that stays moist for days, thanks to a yogurt boost, and a golden crust that begs to be toasted.
The vanilla swirl isn’t just decorative—it adds layers of flavor that balance the natural sweetness of the bananas. Plus, it’s customizable: swap in chocolate chips, nuts, or even a sprinkle of cinnamon for extra personality.
By the time it emerges from the oven, your kitchen will smell like childhood memories, and your loaf will be perfectly domed, with a crackly top that hides the most tender, banana-kissed crumb inside.
Slice it thick, serve it warm, and watch it disappear—this is the kind of treat that makes afterschool moments feel extra special. No mixer? No problem. This recipe is designed for simplicity, with a one-bowl method that even young bakers can handle.
Let’s get baking—your afterschool snack just got an upgrade.
Ingredients for afterschool banana bread
Simple ingredients that transform into a nostalgic, moist loaf with magical vanilla swirls.
| Ingredient | Amount | Notes |
|---|---|---|
| Overripe Bananas 🍌 | 3 medium | Mashed to 1.5 cups |
| All-Purpose Flour 🌾 | 2 cups | Sifted for light texture |
| Granulated Sugar 🍚 | 1 cup | Light brown sugar works too |
| Plain Yogurt 🥛 | ½ cup | Greek or dairy-free |
| Vegetable Oil 🫒 | ½ cup | Or melted coconut oil |
| Vanilla Extract 🌿 | 2 tsp | Pure, not imitation |
| Baking Soda 🧂 | 1 tsp | Not baking powder |
| Salt 🧂 | ½ tsp | Fine sea salt |
| Vanilla Swirl Ingredients 💛 | Combine below for swirl | |
| All-Purpose Flour 🌾 | ½ cup | For swirl only |
| Granulated Sugar 🍚 | ¼ cup | For swirl only |
| Vanilla Extract 🌿 | 1 tsp | For swirl only |
| Melted Butter 🧈 | 2 tbsp | For swirl only |
The bananas are the star—overripe with brown spots means more natural sweetness and moisture. Trader Joe's or local markets often have perfect ones at a discount. If you can't find ripe enough, bake them in the oven at 300°F for 10 minutes to soften. The yogurt keeps the crumb tender, so Greek yogurt works best—it's thicker and adds protein. For a vegan version, use coconut yogurt. Measure the oil precisely—too much makes the bread greasy, too little makes it dense. The vanilla extract should be pure; imitation won't give that warm, fragrant magic.
No vanilla extract? Vanilla bean paste works in a pinch, or scrape seeds from a vanilla bean. Swap the brown sugar for white if needed, but the molasses in brown sugar adds depth. The swirl ingredients are simple but essential—don't skip them! They create those beautiful pockets of flavor. For extra richness, add 1 tbsp of melted butter to the swirl. If you're feeling adventurous, fold in chocolate chips or chopped nuts to the batter. The baking soda is non-negotiable—it's what gives the bread that classic rise and tender crumb.
This banana bread keeps beautifully—3-4 days at room temperature wrapped in foil, or 1 week in the fridge for maximum freshness. For longer storage, slice and freeze individual portions for up to 3 months. Reheat slices in the toaster or microwave for 10 seconds to restore that warm, comforting texture. The swirl stays intact if you slice it thick, so serve it that way. Leftovers? Toast them for breakfast—trust me, it's even better the next day.
Why You'll Love This Recipe
- No-Fuss Mix-In: I swear by the yogurt—it keeps this bread moist without tasting like a science experiment. Just mash the bananas, toss in dry ingredients, stir, and bake. That’s it. Even my 10-year-old could handle it (and she’s tried).
- Sweet Spot: The sugar and oil blend with those overripe bananas to create a dense, almost cake-like crumb—rich but not cloying. Honestly, the first slice out of the pan is the best part, still warm and fragrant.
- Lunchbox Hero: Slice it up the night before, and it’s breakfast, snack, or dessert the next day. Between us, this is the only bread my kids will eat for school lunches—no peanut butter required.
- Banana Rescue: Turns brown, mushy bananas into something delicious instead of trash. I’ve saved at least $20 this year by using what would’ve gone bad. Plus, it keeps for days, so you’re not scrambling for last-minute snacks.
Step-by-step instructions for afterschool banana bread with vanilla swirls
Here's how to bake moist banana bread with rich vanilla swirls that kids will beg for after school.
🍳 Step 1: Prep the Banana Dough for Perfect Texture
Preheat your oven to 350°F and grease a 9x5-inch loaf pan or line it with parchment paper for easy removal. In a large mixing bowl, mash the 3 medium overripe bananas until completely smooth—no lumps should remain. Overripe bananas are key here; they're sweeter and create a moister bread.
Add the 1 cup granulated sugar, 0.5 cup vegetable oil, 0.5 cup plain yogurt, and 2 teaspoons vanilla extract to the mashed bananas. Mix with a wooden spoon or electric mixer until fully combined. The mixture should be thick but pourable. This is your base—don't skip the yogurt, as it adds moisture and tenderness.
👨🍳 Step 2: Combine Dry Ingredients for Lightness
In a separate bowl, whisk together the 2 cups all-purpose flour, 1 teaspoon baking soda, and 0.5 teaspoon salt. Sift the flour first to aerate it—this ensures your bread will be light and fluffy rather than dense. The baking soda will react with the bananas' natural acids to create lift, while the salt balances sweetness.
Gradually add the dry ingredients to the banana mixture, mixing just until combined. Avoid overmixing—you should still see small flour streaks. The batter will be thick, almost like cookie dough. This is normal and perfect for the moist texture we're after. Let the batter sit for 5 minutes while you prepare the swirl.
🥘 Step 3: Make the Vanilla Swirl Mixture
In a small bowl, combine the 0.5 cup all-purpose flour, 0.25 cup granulated sugar, 1 teaspoon vanilla extract, and 2 tablespoons melted butter for the swirl. Mix with a fork until it forms a crumbly dough. The melted butter should be just warm enough to hold the mixture together but not hot—it should cool slightly before using.
Press the swirl mixture into a ball and flatten it slightly. Wrap it in plastic wrap and chill in the refrigerator for 15 minutes to firm up. This makes it easier to handle and prevents the swirl from melting too quickly during baking. The contrast of warm banana bread with cool vanilla swirls is what makes this recipe special.
🔥 Step 4: Layer and Bake for Golden Perfection
Pour half of the banana batter into the prepared loaf pan, spreading it evenly. Unwrap the chilled swirl mixture and place it on top of the batter. Using a knife, gently press the swirl into the batter, creating a marbled effect. Pour the remaining banana batter over the swirl, then use the knife to swirl the two together lightly—just enough to create pretty patterns without overmixing.
Bake in the preheated oven for 50-60 minutes, or until a toothpick inserted into the center comes out clean with just a few moist crumbs. The top should be golden brown, and the edges should pull away slightly from the pan. If the top browns too quickly, tent the pan with aluminum foil after 30 minutes to prevent over-browning while the center finishes baking.
⏰ Step 5: Cool and Serve for Maximum Enjoyment
Remove the banana bread from the oven and let it cool in the pan for 10 minutes. Then transfer it to a wire rack to cool completely. This cooling period is crucial—it allows the swirls to set properly and prevents the bread from becoming gummy. The contrast between the warm, moist banana bread and the cool vanilla swirls is what makes this recipe truly special.
Slice the banana bread into 1-inch thick pieces and serve warm or at room temperature. The swirls should be visible throughout each slice, adding bursts of vanilla flavor with every bite. Store leftovers in an airtight container at room temperature for up to 3 days or refrigerate for up to 5 days. For best texture, reheat slices in the microwave for 10-15 seconds before serving.
Pro Tips For Making Afterschool Banana Bread
- Mash Bananas First: The second you peel those bananas, smash them with a fork—no blender needed. I learned this the hard way after making a runny mess by skipping it; the flour absorbs mashed banana better than puree, and you’ll avoid a gummy crumb.
- Weigh the Flour: Scooping flour from the bag is a rookie move—use a kitchen scale for 1:1 accuracy. Too much flour dries out the bread, and too little makes it dense; 225 grams for a standard loaf is the sweet spot.
- Skip the Overmixing: Mix the batter just until the flour disappears—maybe 20 seconds max. I used to beat it like I was kneading dough, and the bread turned out tough. The yogurt and oil are your friends here; let them do the work.
- Bake Until Slightly Under: Pull the bread out when the top springs back but still has a few moist spots—it’ll firm up as it cools. My first few batches came out dry because I waited for a toothpick to come out completely clean; the bread keeps baking off the heat.
Essential equipment for afterschool banana bread
One-Bowl Mixer
This recipe is designed for simplicity, and a hand mixer (like the Cuisinart SM-50BC) is my go-to for blending the batter smoothly without overmixing. The flat beater attachment handles the thick banana batter beautifully, and the 3-speed control gives me precise blending power.
If you don’t have a mixer, a sturdy wooden spoon works just fine—just be prepared for a little more elbow grease. 💪
9x5-Inch Loaf Pan
A standard 9x5-inch loaf pan (like the Wilton Premium Non-Stick) is essential for this recipe. It holds the right amount of batter without overflowing, and its size ensures even baking.
For easier removal, I always line the pan with parchment paper—it prevents sticking and gives that perfect pull-apart texture. If you’re short on pans, a 9x5-inch glass baking dish works too, but grease it well to avoid sticking.
Measuring Cups & Spoons
Accurate measurements are key, especially for the yogurt and oil, which affect moisture and texture. I recommend stainless steel measuring cups (like the OXO Good Grips) for liquids and a spoon rest to keep your counters clean.
For the vanilla swirl ingredients, use a small mixing bowl (like the Pyrex Simply Store) to combine them neatly. A flexible silicone spatula helps scrape every last bit of batter from the bowl. 🍴
Plastic Wrap
The vanilla swirl mixture needs to chill before baking, and plastic wrap (like Glad Press'n Seal) is my secret weapon. It keeps the dough from drying out while it firms up in the fridge.
Wrap it tightly around the swirl ball and press it flat—this ensures clean slices and prevents the swirl from melting too quickly in the oven. For extra convenience, use reusable silicone molds if you’re making multiple swirls at once. ✨
Wire Rack
After baking, let your banana bread cool on a wire rack (like the OXO Good Grips) to prevent sogginess. The rack allows air to circulate, setting the swirls perfectly and keeping the bottom crust crisp.
If you’re short on racks, a cooling grid (like the Amazon Basics) works just as well. Pro tip: Place the rack directly on the counter—no need for a baking sheet underneath. 💫
Optional: Toothpick Tester
A toothpick is your best friend for checking doneness. Insert it into the center of the loaf—if it comes out clean (or with just a few moist crumbs), your bread is ready.
For extra precision, I use a digital thermometer (like the Thermoworks Thermapen) to confirm the internal temperature reaches 190-200°F. This ensures the swirls are fully set without overbaking the crust. 🌡️
Nutrition facts
Frequently asked questions
Can I use regular bananas instead of overripe ones?
You can, but your bread won't be as moist or sweet. Overripe bananas (with brown spots) contain more natural sugars and break down more easily, creating that classic tender crumb. If you must use ripe bananas, bake them in the oven at 300°F for 10 minutes first to soften them.
Why does my banana bread turn out dense?
Overmixing the batter is the #1 cause! Mix just until combined—you should still see small flour streaks. The yogurt keeps it tender, so if you skip it or use too little, the texture suffers. Also, make sure your baking soda is fresh (old baking soda loses potency).
How do I make this recipe kid-friendly?
Add chocolate chips, crushed Oreos, or mini marshmallows to the batter before baking. For a fun twist, use a mini loaf pan (6x3-inch) to make individual portions. Kids can even help mix the batter with a wooden spoon—just supervise the oven part!
Can I substitute yogurt with something else?
Yes! Use applesauce (½ cup) for a vegan option, or sour cream (½ cup) for extra richness. For a lighter texture, try mashed sweet potato (½ cup). Just remember these swaps may slightly alter the moisture level—check for doneness early.
How do I store leftovers to keep them fresh?
Wrap slices in plastic wrap and store at room temperature for 2 days. For longer storage, refrigerate for up to 5 days or freeze for 3 months. To revive stale slices, microwave for 10 seconds or warm in a 350°F oven for 5 minutes with a sprinkle of water.