
Side Dishes
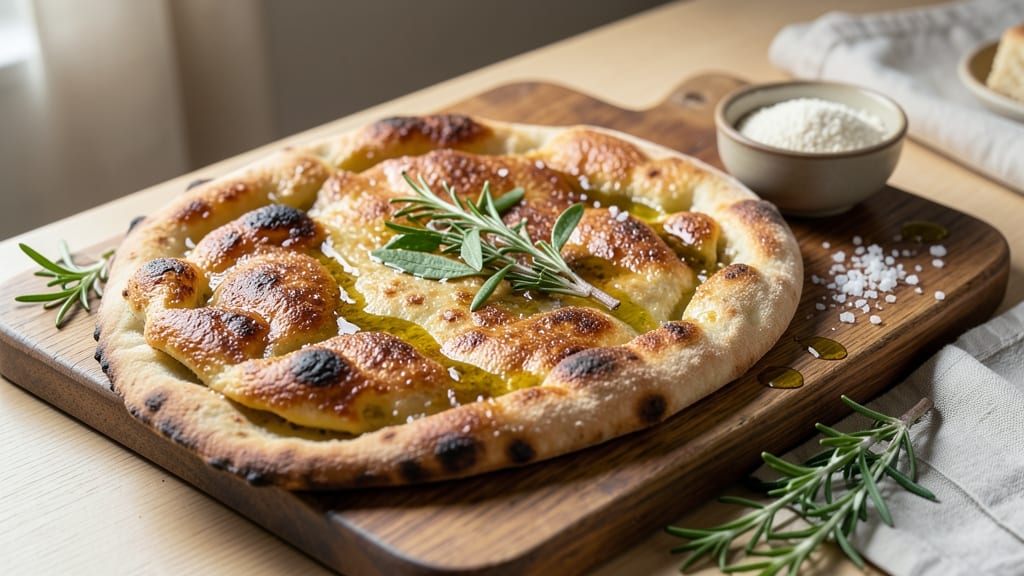
This artisan flatbread recipe delivers the perfect balance of crispy crust and chewy interior—just like you'd find in a rustic Italian trattoria. 💛 The secret lies in a simple dough of flour, water, and a touch of olive oil, combined with precise shaping and baking techniques that create that signature flexible texture.
I've refined this method over years of testing, ensuring every bite is satisfyingly rustic yet approachable for home kitchens.
The dough requires minimal ingredients but maximum technique: high hydration for flexibility, a short rest for gluten development, and shaping by hand to create the signature thickness and texture. Baking in a Dutch oven mimics wood-fired results, giving you that coveted crispy crust while keeping the center tender.
This method works for both traditional flatbreads and modern variations like rosemary-infused or whole-grain versions.
What you'll achieve is a flatbread with a golden, crackly crust that gives way to a soft, chewy interior—ideal for dipping in olive oil or pairing with soups and stews. The dough's simplicity means you can customize it with herbs, seeds, or spices without sacrificing the foundational texture.
Whether you're serving it as a side or making it the star of the meal, this recipe delivers professional-quality results at home.
Ready in under an hour with just 15 minutes of active prep, this flatbread is perfect for weeknight dinners or special occasions. The key to success lies in patience—letting the dough rest and shaping it carefully to ensure even baking.
Once you master this technique, you'll never buy store-bought flatbread again.
Ingredients for artisan flat bread
High-protein flour, precise hydration, and Dutch oven magic create restaurant-quality flatbread at home.
| Ingredient | Amount | Notes |
|---|---|---|
| All-Purpose Flour 🌾 | 3 cups | High-protein for elasticity (12-14% protein) |
| Extra-Virgin Olive Oil 🫒 | ½ cup | Cold-pressed, fruity variety preferred |
| Warm Water 💧 | 1 ¼ cups | 105°F-110°F for optimal gluten development |
| Kosher Salt 🧂 | 1 ½ tsp | Diamond Crystal preferred for precision |
| Instant Yeast 🍞 | ¼ tsp | Fresh yeast at 1 tsp (double the amount) |
| Semolina Flour 🌾 | 2 tbsp | For dusting and rolling (optional but recommended) |
| Cornmeal 🌽 | 1 tbsp | For Dutch oven preheating |
| Fresh Rosemary 🌿 | 1 tbsp | Finely chopped, optional for infusion |
The flour choice determines texture—King Arthur or Caputo Tipo 00 deliver that signature chewy bite. Most grocery stores carry all-purpose, but Whole Foods or Trader Joe's have higher-protein options if available. For the olive oil, California avocado oil or Italian extra-virgin (like Colavita) adds subtle flavor. The yeast should be fresh—if using active dry, proof it in warm water for 5 minutes first. Pre-measure everything: this dough's hydration (65%) is critical for flexibility.
No semolina? Fine cornmeal or all-purpose flour works in a pinch, though texture differs slightly. Swap rosemary for thyme, oregano, or sesame seeds—just halve the amount if using seeds. The water temperature matters: too hot kills yeast, too cold slows fermentation. Room temperature water (75°F) is safest. For a whole-grain variation, replace 1 cup all-purpose with whole wheat or spelt, but expect slightly denser results. The Dutch oven is non-negotiable—Le Creuset or Lodge brands conduct heat best.
Dough keeps 24 hours refrigerated wrapped in plastic, but shape within 4 hours for best texture. Pre-shape dough balls 1 hour ahead for convenience. Store-bought Dutch ovens (like Amazon Basics) work fine—just preheat with cornmeal for 10 minutes at 450°F. Flatbread reheats beautifully: 5 minutes at 350°F restores crispiness. Freeze shaped dough balls for 3 months—bake straight from frozen, adding 2-3 minutes.
Why You'll Love This Recipe
- Five-Ingredient Magic: I swear by this combo—flour, olive oil, water, salt, and yeast. That’s it. No fancy pantry trips, no confusing ratios. Just mix, knead, let it rise, and boom: restaurant-quality flatbread with ingredients you already own.
- Crispy-Creamy Payoff: Here’s what sold me—the contrast. The edges get blistered and golden from the oven, while the center stays pillowy soft. Drizzle it with that same olive oil you used in the dough, and suddenly, every bite feels like a little celebration.
- Weeknight Superhero: Between us, I make this at least twice a week. It’s my go-to for sandwiches, wraps, or even a quick charcuterie board base. No waiting for store-bought to thaw—just pull it fresh from the oven, still warm, and ready to feed the whole family.
- Budget-Friendly Staple: Honestly, this recipe is my secret weapon for stretching meals. A single batch stretches across lunches, dinners, and snacks. Freeze extras for when you’re too tired to bake, and they reheat like they’re fresh out of the oven. (Yes, even on a Tuesday night.)
Step-by-step instructions for artisan flatbread
Master the technique for restaurant-quality flatbread with a crispy crust and chewy interior.
👨🍳 Step 1: Mix the Dough with Precision
In a large mixing bowl, combine the 3 cups all-purpose flour, 1.5 tsp kosher salt, and 0.25 tsp instant yeast. Create a well in the center and add the 0.5 cup extra-virgin olive oil and 1 tbsp finely chopped fresh rosemary. The rosemary is optional but adds a fragrant depth—just don't overdo it.
Gradually pour in the 1.25 cups warm water (between 105°F-110°F) while stirring with a wooden spoon. Mix until a shaggy dough forms, then turn it out onto a lightly floured surface. Here's the thing—this dough is sticky by design. High-protein flour and olive oil create elasticity, but don't be tempted to add extra flour yet. Kneading develops gluten, which gives that signature chewy texture.
Knead for 8-10 minutes by hand or 5-6 minutes with a stand mixer using the dough hook. You'll know it's ready when the dough springs back slowly when poked and forms a smooth, elastic ball. If it's too sticky, wet your hands slightly—dry flour will toughen the texture. Cover the bowl with a damp towel and let it rest at room temperature for 1 hour. This rest period relaxes the gluten and allows the yeast to activate fully.
🔥 Step 2: Preheat and Prepare the Dutch Oven
While the dough rests, preheat your oven to 475°F. Place a 10-inch cast-iron Dutch oven in the oven to heat for 30 minutes. This intense heat is crucial—it creates that signature crispy crust while keeping the interior tender. I use a 1 tbsp cornmeal to coat the bottom of the Dutch oven before placing the dough inside. Sprinkle it evenly and tap out any excess.
Real talk: the Dutch oven must be hot before you add the dough. If it's not properly preheated, you'll end up with flatbread that's more like a dense cracker. The cornmeal also prevents sticking and adds a subtle, nutty flavor that pairs perfectly with the olive oil.
🍳 Step 3: Shape and Score the Dough
After the dough has rested, turn it out onto a lightly floured surface dusted with 2 tbsp semolina flour. The semolina adds texture and prevents sticking better than all-purpose flour. Pat the dough into a ½-inch thick rectangle using your hands or a rolling pin. I like to keep it slightly uneven—this creates interesting thickness variations when baked.
Use a sharp knife or pizza cutter to score the dough in a simple pattern—crosshatch, diamond, or straight lines work best. Scoring prevents uneven expansion and gives that professional bakery look. Transfer the shaped dough to the preheated Dutch oven, seam-side up. It should fit snugly but not be forced.
🔥 Step 4: Bake to Crispy Perfection
Bake the flatbread for 20-25 minutes until the edges are deep golden brown and the interior reaches 200°F when tested with an instant-read thermometer. The Dutch oven will create steam, which develops that signature chewy interior while the direct heat crisps the crust. Don't open the oven during baking—you'll lose heat and steam, which affects texture.
Here's where it gets fun—when you remove the flatbread, it should be hot enough to handle with oven mitts. Immediately transfer it to a wire rack to cool for 5 minutes. This resting period prevents the bottom from becoming soggy and allows the crust to set properly. The flatbread should have a crisp exterior that gives way to a soft, pillowy interior with just a hint of chew.
🍽️ Step 5: Serve Warm with Confidence
Slice the flatbread into wedges or serve whole, depending on your preference. The texture should be flexible enough to fold but still hold its shape. If you added rosemary, you'll notice its aroma intensifies as it cools slightly. Serve immediately with olive oil for dipping, fresh herbs, or as a base for your favorite toppings.
This flatbread keeps well at room temperature for 2 days in an airtight container, but it's best enjoyed fresh. The key to success lies in the high heat of the Dutch oven and proper dough handling. Don't rush the kneading or resting—these steps are what transform simple ingredients into something extraordinary.
Pro Tips For Making Artisan Flat Bread
- Use Olive Oil Like a Pro: Drizzle the EVOO after shaping the dough, not before—this keeps the crust crispy without making it greasy. I learned this the hard way when my first batch turned out soggy because I mixed it in too early. A light brush (about 1 teaspoon per dough ball) is all you need for that golden, shatterable crust.
- Rest the Dough Twice: Let the dough rise once after mixing (30-45 minutes), then shape it and refrigerate for at least 2 hours. This slows fermentation, giving you more control over flavor and texture. (Yes, it’s tempting to skip this, but your flatbread will taste noticeably flatter if you don’t.)
- Salt the Water Hard: Dissolve all the kosher salt in the warm water before mixing—undissolved grains will create uneven pockets in the dough. I used to sprinkle it in later, and my bread always had random salty spots. Trust me, this step guarantees even flavor.
- Preheat the Pan Properly: Heat your cast-iron or heavy skillet until it’s smoking hot—this isn’t the time to play it safe. A screaming-hot pan sears the bread in seconds, locking in moisture and creating those coveted blisters. (If you’re unsure, hold your hand 6 inches above it—you should pull back immediately.)
Creative variations of artisan flat bread
Herb-Infused Twists
Swap the rosemary for fresh thyme or dried oregano—just reduce to 1 tsp since dried herbs are more potent. For a Mediterranean vibe, add 1 tbsp finely chopped sun-dried tomatoes and 2 tbsp crumbled feta to the dough.
I love using Penzeys' za'atar blend (½ tsp) for a Middle Eastern-inspired version—sprinkle it on top before baking for that signature nutty, tangy flavor. 🌿
Seed & Nut Variations
For extra crunch, fold 2 tbsp toasted sesame seeds or 1 tbsp chopped walnuts into the dough before shaping. A pumpkin seed and honey combo works beautifully—mix 1 tbsp ground pumpkin seeds with 1 tsp honey and brush it on the baked flatbread.
For a savory twist, try crushed black pepper and smoked paprika (½ tsp each) mixed into the dough. 🌰
Whole-Grain Upgrades
Replace 1 cup all-purpose flour with whole wheat flour or spelt flour for a nuttier, heartier texture. For a chickpea flour version (great for gluten-free adaptions), use 1 cup chickpea flour plus ½ cup all-purpose flour—add 1 extra tbsp olive oil to compensate for the lower gluten content.
I’ve also had success with buckwheat flour (½ cup) for a slightly earthy flavor. 🌾
Sweet Adaptations
Turn your flatbread into a dessert by adding 1 tbsp cinnamon and 2 tbsp brown sugar to the dough. Brush the baked flatbread with 2 tbsp melted butter and sprinkle with cinnamon sugar for a cinnamon roll-inspired treat.
For a honey and walnut version, fold 2 tbsp chopped walnuts and 1 tbsp honey into the dough before shaping. Serve warm with Greek yogurt and maple syrup for dipping. 🍯
Global-Inspired Styles
For an Indian naan twist, add 1 tbsp plain yogurt and ½ tsp garam masala to the dough. Shape into small balls and bake in the Dutch oven for 12-15 minutes per batch.
A Mexican-style version calls for 1 tsp cumin and ½ tsp chili powder, topped with crumbled queso fresco after baking. For Italian focaccia, increase the olive oil to ⅔ cup, add 1 tsp dried rosemary, and dimple the top with your fingers before baking. 🌎
Protein-Packed Add-Ins
Boost nutrition by folding 2 tbsp grated Parmesan or 1 tbsp nutritional yeast into the dough for a cheesy, umami kick. For a savory breakfast version, mix in 2 tbsp chopped sun-dried tomatoes and 1 tbsp goat cheese—perfect with scrambled eggs or avocado toast.
A smoked paprika and crumbled sausage combo (½ cup cooked, crumbled) adds heartiness to soups or stews. 🧀
Nutrition facts
Frequently asked questions
Why does my artisan flatbread turn out dense instead of chewy?
Over-kneading or adding too much flour are the most common culprits. This dough relies on high hydration (65%) for that signature chew—stick to the 1.25 cups water measurement and resist the urge to flour excessively. Also, ensure your yeast is fresh and the water is between 105°F-110°F. The 1-hour rest is crucial for gluten relaxation, so don't skip it!
Can I make this flatbread without a Dutch oven?
Yes! Use a 12-inch cast-iron skillet or heavy baking sheet> instead. Preheat it for 15 minutes> at 475°F> and place the shaped dough directly on it. Bake for 12-15 minutes>, flipping halfway for even browning. The texture will be slightly less crispy but still delicious. For extra crunch, broil for 1-2 minutes> at the end.
How do I store leftover flatbread?
Cool completely, then wrap in a clean kitchen towel> or place in an airtight container>. Store at room temperature for 2 days> or freeze for up to 3 months>. To revive, reheat in a 350°F> oven for 5 minutes> or toast in a dry skillet over medium heat> for 1-2 minutes> per side. The towel method keeps it crispy longer than plastic!
What's the best way to add herbs or seeds?
For herbs like rosemary or thyme, fold them into the dough during mixing—they'll infuse the entire flatbread. For seeds (sesame, pumpkin, etc.), sprinkle 1 tbsp> on the work surface before shaping, then roll the dough to coat evenly. Press seeds into the top after shaping for decoration. Pro tip: Toast seeds in a dry pan for 2 minutes> before adding to enhance flavor!
Can I make this gluten-free?
Yes, but expect a slightly different texture. Replace 1 cup all-purpose flour> with chickpea flour> and add 1 extra tbsp olive oil> to compensate for lower gluten content. For best results, use a gluten-free flour blend> with xanthan gum. The hydration ratio may need adjustment—start with 1.1 cups water> and adjust based on dough consistency. Bake at 450°F> for 18-20 minutes> to prevent burning.