
Side Dishes
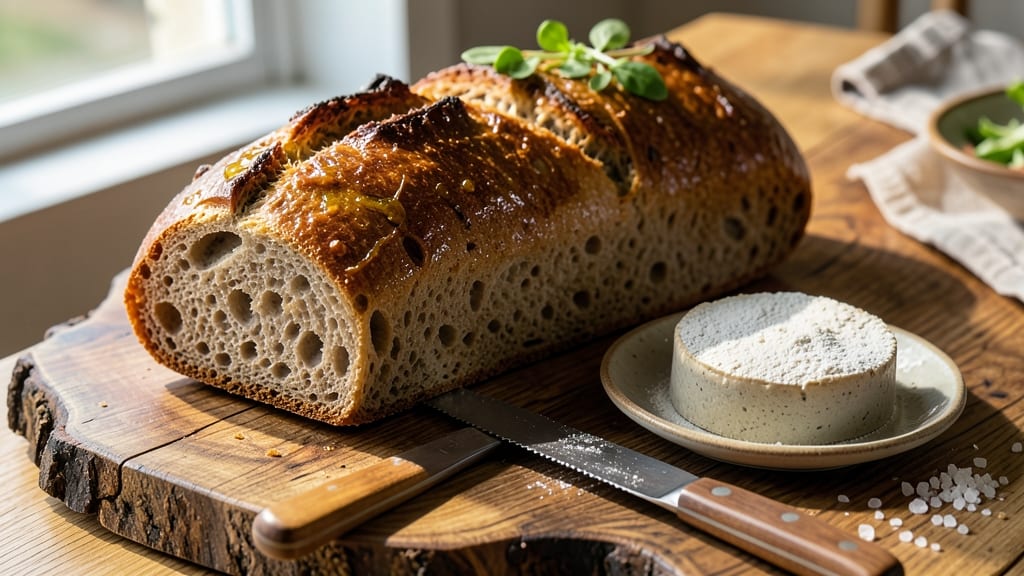
This Australian sourdough bread recipe delivers the perfect balance of crusty crown and tangy open crumb that defines authentic artisan loaves. 🌟 The secret lies in a high-hydration dough and patient fermentation, creating a texture that's both airy and satisfying.
I've refined this method over years of baking, ensuring every loaf develops that signature open crumb structure and crispy, caramelized crust.
The process begins with a robust sourdough starter that captures wild yeast and bacteria for authentic flavor development. We'll use a high hydration dough (around 75-80%) that requires careful handling but rewards with an incredibly open crumb structure.
The long fermentation—both at room temperature and overnight in the fridge—allows flavors to develop fully while creating that signature tang.
What sets this recipe apart is the attention to detail in shaping and scoring. Properly tensioned dough creates an even oven spring, while strategic scoring guides the expansion for that classic sourdough look.
The result is a loaf with a deep caramelized crust, an open crumb filled with air pockets, and a subtle tang that lingers with every bite.
Perfect for sandwiches, toast, or serving alongside soups, this sourdough becomes the star of any meal. The recipe includes both traditional methods and modern shortcuts to fit different schedules while maintaining authentic quality. Let's get started on creating your perfect loaf.
Ingredients for australian sourdough bread
The secret to that iconic Australian sourdough lies in these carefully chosen ingredients—each playing a crucial role in creating the perfect crusty crown and airy crumb.
| Ingredient | Amount | Notes |
|---|---|---|
| Active Sourdough Starter 🍞 | ½ cup | 100% hydration, bubbly and active |
| All-Purpose Flour 🌾 | 3 ½ cups | High-protein preferred for structure |
| Bread Flour 🌾 | 1 ½ cups | For enhanced gluten development |
| Whole Wheat Flour 🌾 | ½ cup | For nutty depth and texture |
| Kosher Salt 🧂 | 1 ½ tsp | Diamond Crystal preferred |
| Unsalted Butter 🧈 | ¼ cup | Cold, cubed for dough enrichment |
| Water 💧 | 2 ¼ cups | Lukewarm, filtered preferred |
| Honey 🍯 | 1 tbsp | For fermentation boost and sweetness |
| Olive Oil 🫒 | 1 tbsp | Extra-virgin for dough elasticity |
| Semolina Flour 🌾 | ¼ cup | For dusting and crispy crust |
| Cornmeal 🌽 | 2 tbsp | For baking surface adhesion |
The sourdough starter is non-negotiable here—it's the soul of this bread. Grab a 100% hydration starter from a trusted source like King Arthur Baking or make your own using a mix of all-purpose flour and water (equal parts). Look for a starter that's bubbly, domed, and smells tangy—this means it's ready to work its magic. The high-protein bread flour and whole wheat flour combo gives you that signature open crumb, while the cold butter cubes add richness without overpowering the tang. For flour, I swear by King Arthur or Caputo—they're worth the investment for this recipe.
No bread flour? All-purpose flour plus 1 tbsp vital wheat gluten gets you close. Short on whole wheat? Swap for rye flour at half the amount for a deeper flavor. The honey can be replaced with maple syrup (same amount), but don't skip it—it feeds the yeast and adds subtle sweetness. For the butter, vegan butter works in a pinch if you're avoiding dairy, though it won't caramelize quite the same way. The olive oil is crucial for elasticity—store-bought extra-virgin is fine, but if you've got infused oils, now's the time to use them up. And if you're scoring the dough, a razor blade gives the cleanest cuts, but a sharp serrated knife works too.
This dough is a beast—it needs time and patience. The starter should be fed 4-6 hours before use for peak activity. Once mixed, let it rest 30 minutes before shaping to relax the gluten. For shaping, floured hands and a clean surface are essential—don't skimp on the flour here. The dough keeps 24 hours in the fridge before baking, so plan ahead. Once baked, it's best eaten fresh, but sliced and wrapped in a cloth, it stays fresh for 3-4 days. Freeze any extras—sliced and wrapped in parchment—for up to 3 months. The crust gets crunchier with time, so if it's not perfectly crisp right away, toast it before serving.
Why You'll Love This Recipe
- No-Knead Magic: I swear by this method—just mix, rest, and bake. The bread flour and whole wheat blend gives it that perfect chew without requiring me to punch or fold for hours.
- Tangy Crust, Soft Heart: That active starter brings a deep, funky flavor you won’t find in store-bought loaves. The kosher salt cuts through the richness, leaving you with a crust that’s crisp enough to shatter but a crumb so tender it melts.
- Weeknight & Picnic Hero: I keep a batch in the freezer for lazy mornings—just toast slices straight from frozen. Or pack it for a day out; it holds up better than any sandwich bread I’ve tried, even with the whole wheat in the mix.
- Budget-Friendly Staple: Flour and salt are cheap, and a small starter goes a long way. I’ve made this for 10+ people without breaking the bank, and the leftovers? Perfect for toast, croutons, or even breadcrumbs for future recipes.
Step-by-step instructions for Australian sourdough bread
Here's how to craft that iconic Australian crusty loaf with an open crumb and tangy depth.
👨🍳 Step 1: Combine Wet Ingredients and Feed the Starter
In a large mixing bowl, whisk together the 2.25 cups lukewarm water, 1 tbsp honey, and 1 tbsp olive oil until fully combined. This creates a sweet, elastic base that will help develop gluten beautifully. In a separate small bowl, gently mix the 0.5 cup active sourdough starter with 1 tbsp of this wet mixture - this "feeding" ensures your starter is lively and ready to work.
I like to use a silicone spatula for this step because it doesn't scratch bowls and makes mixing easier. The honey not only adds sweetness but also provides a gentle boost to fermentation. Let the starter sit at room temperature for 10 minutes while you prepare the dry ingredients - you'll see it become more active and bubbly, which is exactly what we want.
👨🍳 Step 2: Mix Dry Ingredients and Build the Dough
In the same bowl with the wet ingredients, add the 3.5 cups all-purpose flour, 1.5 cups bread flour, 0.5 cup whole wheat flour, and 1.5 tsp kosher salt. Use a wooden spoon to break up any flour lumps before gradually mixing everything together until you have a shaggy, sticky dough.
This flour blend creates the perfect balance - the all-purpose gives structure, bread flour develops strong gluten, and whole wheat adds that characteristic Australian nutty depth. The salt isn't just for flavor; it helps regulate fermentation and strengthens the gluten network. Once combined, the dough should be tacky but manageable - if it's too sticky, add 1 tbsp more all-purpose flour.
🍳 Step 3: Knead and Develop Gluten for Structure
Turn the dough out onto a lightly floured surface and knead vigorously for 10-12 minutes until smooth and elastic. I press down hard with the heel of my hand and fold the dough toward me, rotating the bowl each time. You'll know you're getting there when the dough springs back slowly when poked and forms a windowpane when stretched thin.
This kneading step is crucial for developing that open, airy crumb Australians love. The bread flour's higher protein content helps create strong gluten strands that will trap gas during fermentation. If your kitchen gets warm, don't worry - the dough will be ready sooner. Just watch for that perfect balance between stretchy and firm when you pull and release the dough.
🥘 Step 4: First Fermentation and Bulk Rise
Shape the dough into a loose round and place it in a lightly oiled bowl. Cover with a damp towel and let rise at room temperature for 3-4 hours or until it's doubled in size. The dough should feel light and airy when pressed gently - it should spring back immediately but with noticeable puffiness.
This is where the magic happens. The active sourdough starter creates lactic and acetic acids that give Australian sourdough its signature tang. The honey and olive oil work together to create a more elastic dough that can handle the long fermentation. I like to check the dough every 30 minutes during this stage - you're looking for about 75% rise before it starts to collapse slightly.
🔥 Step 5: Shape, Proof, and Bake for Crusty Perfection
Turn the dough out onto a surface dusted with 0.25 cup semolina flour and gently shape it into a round boule. Place it seam-side up in a proofing basket lined with a floured towel. Cover and let proof for 1-2 hours until it's fully risen and springs back when pressed firmly.
Preheat your oven to 450°F with a Dutch oven inside for 30 minutes. Right before baking, score the dough deeply with a razor blade in a crosshatch pattern. Transfer the dough to the hot Dutch oven and bake covered for 20 minutes, then uncovered for 25-30 minutes until deep golden brown. The internal temperature should reach 205-210°F.
This baking method creates that iconic Australian crust - thick, crispy, and dark brown on the outside while keeping the interior tender and open. The semolina flour gives that beautiful crunchy crust, while the cornmeal on your baking sheet prevents sticking. Let the bread cool completely before slicing - this ensures clean cuts and maximum flavor development.
Pro Tips For Making Australian Sourdough Bread
- STRETCH AND WAIT: The dough will fight you—especially with whole wheat. After the first bulk ferment, stretch and fold every 30 minutes for 2 hours (yes, even at night). I used to cut corners here, and my loaves turned dense. This builds strength and guarantees that open crumb.
- WEIGH THE WHOLE WHEAT: Don’t eyeball it. Whole wheat flour absorbs moisture differently, and this recipe relies on its texture. Weigh it precisely—even a 10g difference throws off hydration. I learned this after a batch turned gummy; now I measure it last, right before mixing.
- SALT THE STARTER: Add the full kosher salt directly to the starter when feeding it 24 hours before baking. This flavors the entire loaf from the start and prevents a bland crust. I skipped this once and spent 10 minutes over-salting the dough later—don’t make that mistake.
- STEAM THE CRUST: Preheat your Dutch oven with a metal bowl of boiling water inside for 20 minutes before baking. The steam mimics a professional oven and gives you that signature Australian sourdough crack—crisp, shatterable, and golden. No steam? At least spray the dough with water right before covering.
Regional styles of australian sourdough bread
Sydney-Style Sourdough
Sydney bakers prioritize a high hydration dough (80%) with a long cold proof overnight, creating that signature open crumb. I use King Arthur bread flour for structure and add 2 tbsp rye flour for depth—this combo gives the perfect balance of chewiness and airiness.
The secret? A 24-hour cold proof in the fridge before baking, which develops complex flavors while preventing overproofing. 🌟
Melbourne's Rustic Approach
Melbourne bakers often incorporate wholemeal flour (up to 20% of total flour) for a nutty, hearty texture. I recommend 1 cup wholemeal flour plus 2.5 cups bread flour for a rustic loaf with a thicker crust.
The scoring technique matters here—use a sharp razor blade to cut a deep crosshatch pattern before baking. This creates dramatic oven spring and a crispy, caramelized exterior.
Tasmanian Mountain Bread
Tasmania’s cooler climate inspired a longer fermentation (up to 48 hours) for deeper flavor development. I add 1 tsp malt powder to the dough to enhance browning and improve gluten structure. The result?
A denser crumb with a thicker, crackly crust—perfect for hearty sandwiches. For extra authenticity, bake in a cast-iron Dutch oven preheated to 475°F for 30 minutes before adding the dough.
Queensland's Sweet Variation
Queensland bakers often sweeten their sourdough with 1-2 tbsp golden syrup instead of honey, giving the bread a milder tang and subtle caramel notes. I swap 1 tbsp honey for 1 tbsp golden syrup and add 1 tsp cinnamon to the dough for warmth.
This version is ideal for breakfast toast or fruit-filled pastries—the sweetness balances the sourdough’s acidity beautifully.
Brisbane's Crusty Classic
Brisbane’s humid climate demands a shorter bulk fermentation (just 2-3 hours) to prevent overproofing. I use 100% bread flour for a tighter crumb and 1 tbsp olive oil to improve elasticity. The key?
A steam bath during baking—place a tray of boiling water in the oven for the first 15 minutes to create a shinier, crispier crust. This method is perfect for sandwiches and charcuterie boards.
Modern Australian Shortcuts
For busy bakers, try a 24-hour cold starter (feed your starter at night, use it the next day) to save time. I also recommend pre-shaping the dough the night before and storing it in the fridge—just shape it loosely, cover it, and let it ferment overnight.
This cuts active baking time by half while keeping the open crumb intact. Use a digital thermometer to monitor oven temp—450°F is critical for that caramelized crust. ✨
Nutrition facts
Frequently asked questions
What makes Australian sourdough different from other sourdough breads?
The key differences lie in the high hydration dough (75-80%) and long fermentation (often including overnight cold proofing). Australian sourdough typically features a crispy, caramelized crust with an open, airy crumb structure—more pronounced than European styles. The use of whole wheat flour and rye flour adds nutty depth, while regional variations (like Queensland's sweet versions) create unique flavor profiles.
Can I use all-purpose flour instead of bread flour?
Yes, but you'll need to add 1 tbsp vital wheat gluten per cup of all-purpose flour to compensate for the lower protein content. This helps develop the strong gluten network needed for that signature open crumb. For best results, use a mix of 70% all-purpose and 30% bread flour—this maintains structure while keeping the dough manageable.
Why does my Australian sourdough have a dense crumb instead of an open one?
A dense crumb usually means underproofing or insufficient gluten development. Try these fixes: Extend bulk fermentation by 1-2 hours, ensure proper kneading (aim for 10-12 minutes until elastic), or increase hydration slightly (80%). Also check your starter—it should be very active (doubling in 4-6 hours) before using. Cold proofing overnight helps too!
How long can I keep the dough before baking?
Unshaped dough keeps 24 hours in the fridge after initial mixing, while shaped dough can ferment up to 48 hours before baking. The longer it ferments, the more flavor develops—but don't exceed 72 hours or risk overproofing. For best results, shape the dough the night before and bake the next day. This cold fermentation creates that tangy depth Australians love!
What's the best way to reheat stale Australian sourdough?
For maximum crust crispiness, wrap the whole loaf in foil and bake at 350°F for 10 minutes, then uncover and bake 5-10 more minutes until golden. For individual slices, toast in a preheated skillet over medium heat for 1-2 minutes per side until crispy. Avoid microwaving—it kills the crust's texture!