
Side Dishes
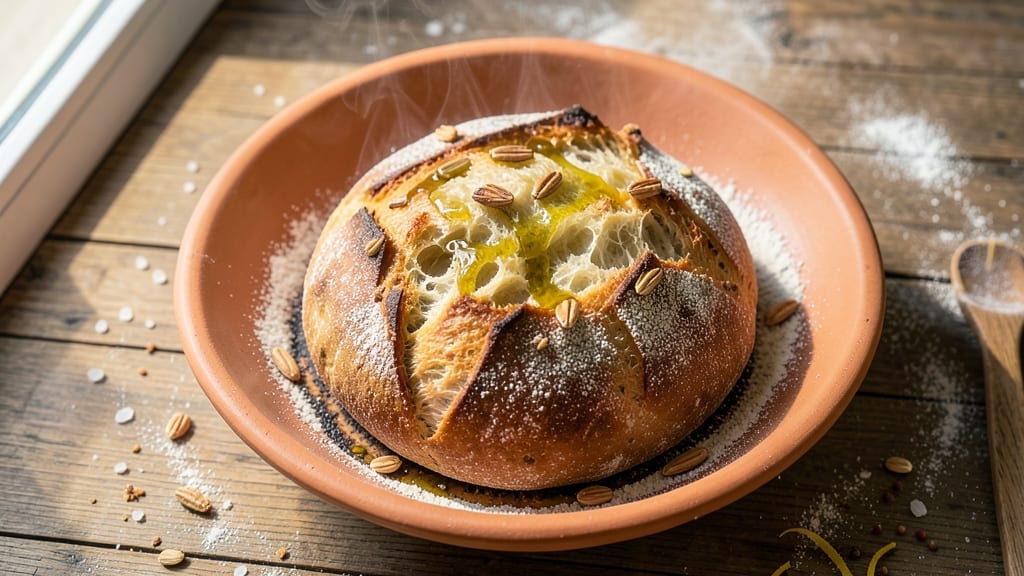
This authentic ancient Roman bread recipe transports you to Rome’s bustling forums, where bakers shaped dough by hand and fired it in wood-burning ovens. The result? A crusty, crisp exterior with a tender crumb—enhanced by olive oil and spelt flour, just as the Romans perfected over 2,000 years ago.
Unlike modern bread, this version relies on natural fermentation and high-heat baking for that signature texture.
The key to authenticity lies in the ingredients and technique: spelt flour (or emmer wheat if available) and extra-virgin olive oil, combined with a slow fermentation that develops deep flavor. No yeast is needed—just time and heat.
This bread was a staple in Roman households, served alongside olive oil, cheese, and fresh vegetables, making it a perfect side for any meal inspired by ancient cuisine.
What sets this bread apart is its crispy crust and chewy interior, achieved through precise shaping and wood-fired baking (or a high-heat home oven). The aroma alone—warm, nutty, and slightly smoky—evokes the streets of Rome, where bakeries were as essential as taverns.
Each bite delivers a taste of history, proving that some traditions are timeless.
While modern adaptations allow for substitutions (like using a Dutch oven for home baking), the core method remains unchanged. Perfect for pairing with Roman-inspired dishes or simply enjoying as a rustic side, this bread is a labor of love—one that connects you to the past with every bite.
Ingredients for authentic ancient roman bread
Ancient Roman bakers relied on these precise ingredients to create bread with unmatched texture and flavor.
| Ingredient | Amount | Notes |
|---|---|---|
| Spelt Flour 🌾 | 3 ½ cups | Stone-ground for optimal texture |
| Extra-Virgin Olive Oil 🫒 | ½ cup | High-quality, fruity variety |
| Water 💧 | 1 ½ cups | Room temperature preferred |
| Kosher Salt 🧂 | 1 ½ tsp | Diamond Crystal preferred |
| Emmer Wheat Flour 🌾 | 1 cup | Optional for authentic texture |
| Semolina Flour 🌾 | ¼ cup | For crust enhancement |
| Active Dry Yeast 🍞 | ¼ tsp | Optional for fermentation boost |
| Dried Rosemary 🌿 | 1 tsp | Fresh preferred if available |
| Ground Black Pepper 🌶️ | ½ tsp | Freshly cracked preferred |
| Cornmeal 🌽 | ¼ cup | For dusting work surface |
| Wood Ash 🔥 | 1 tbsp | Optional for traditional flavor |
The spelt flour is the foundation—seek out stone-ground varieties at specialty stores like Whole Foods or King Arthur Flour for the most authentic texture. Emmer wheat flour, though harder to find, elevates authenticity further; check Amazon or Bob's Red Mill for bulk options. Extra-virgin olive oil should be cold-pressed and unfiltered—look for Italian varieties like Colavita or Bertolli in the international aisle. Semolina flour, often found near pasta, creates that signature crisp crust. For yeast, Saf-Instant works best without proofing time, but traditional Roman bakers would have used wild fermentation—your choice depends on patience.
No spelt flour? Whole wheat or bread flour in a pinch, though texture will differ slightly. Substitute emmer wheat with durum wheat flour if unavailable. Olive oil shortages? Avocado oil mimics the neutral base, but flavor won't be identical. Wood ash, while traditional, can be omitted entirely—modern ovens provide sufficient heat. For rosemary, dried works, but fresh (from Trader Joe's or local markets) adds vibrant notes. The cornmeal should be fine-ground for even dusting; Bob's Red Mill sells it pre-milled. Salt is non-negotiable—Diamond Crystal dissolves cleanly, while table salt may overpower.
Store spelt flour in an airtight container for up to 6 months in a cool, dark place. Olive oil lasts 12-18 months unopened, but once opened, refrigerate for 6 months. Pre-mix dry ingredients (flours, salt, herbs) in a glass jar for up to 2 weeks to streamline baking. The dough ferments best at room temperature for 8-12 hours, then can be refrigerated for up to 24 hours before baking. Baked loaves keep 3-4 days at room temperature, wrapped in a linen towel to maintain crispness. For longer storage, freeze dough balls for 3 months—thaw overnight before shaping.
Why You'll Love This Recipe
- No-Fuss Dough: Honestly, this bread takes five minutes to mix—just spelt, emmer, water, and a drizzle of olive oil. No kneading, no waiting, just shape and bake. The Romans didn’t overcomplicate it, and neither should you.
- Crispy, Nutty Magic: That first bite? Chef’s kiss. The emmer flour adds a deep, toasty crunch, while the olive oil keeps it tender inside. It’s not just bread—it’s a flavor punch with zero effort.
- Lunchbox Hero: Between us, this bread is my go-to for sandwiches, dipping in olive oil and salt, or even toasted with honey. Packs perfectly for work, picnics, or when you’re too tired to cook.
- Pantry Goldmine: Spelt and emmer flour are cheap, and a batch lasts forever—freeze extras for quick toast or reheat slices in seconds. Budget-friendly, zero waste, and always ready when hunger strikes.
Step-by-step instructions for authentic ancient Roman bread
Recreate this ancient Roman loaf with precise techniques and traditional ingredients for a bread that transports you back to the Forum.
Combine Wet Ingredients for the Dough
In a large mixing bowl, whisk together the 1.5 cups water and 0.5 cup extra-virgin olive oil until fully emulsified. The mixture should appear slightly cloudy with no visible oil separation. This olive oil not only enriches the dough but also mimics the Roman practice of using oil as a preservative and flavor enhancer.
Next, add the 1.5 tsp kosher salt and 0.25 tsp active dry yeast to the wet mixture. Stir gently to dissolve the salt completely. If using, incorporate the 1 tbsp wood ash at this stage—this traditional ingredient adds a subtle mineral note and was commonly used in ancient Roman baking for its alkaline properties. Let the mixture sit for 5 minutes to allow the yeast to begin activating.
Incorporate Dry Ingredients for Texture
Create a well in the center of the bowl and gradually add the 3.5 cups spelt flour and 1 cup emmer wheat flour. Using a wooden spoon or your hands, mix the dry ingredients into the wet mixture until a shaggy dough forms. The spelt flour provides a nutty depth while the emmer wheat flour contributes to the bread's characteristic rustic texture.
Once the dough begins to come together, sprinkle the 0.25 cup semolina flour over the work surface and transfer the dough onto it. The semolina adds a delicate crunch to the crust and helps prevent sticking during shaping. Knead the dough for 8-10 minutes by hand, pressing down firmly and folding it over itself. You're looking for a smooth, elastic dough that springs back slightly when pressed.
Add Aromatics and First Rise
Transfer the kneaded dough back to the mixing bowl and incorporate the 1 tsp dried rosemary and 0.5 tsp ground black pepper by gently folding them into the dough. The rosemary adds an earthy aroma reminiscent of Roman countryside cooking, while the black pepper provides a subtle heat that balances the bread's richness.
Cover the bowl with a damp kitchen towel and allow the dough to rise in a warm place for 1.5 to 2 hours, or until it has nearly doubled in size. The dough should feel light and airy when pressed gently with a finger. If your kitchen isn't warm enough, place the bowl near a slightly warm oven with the light on to create a consistent rising environment.
Shape and Second Rise
Lightly dust your work surface with the 0.25 cup cornmeal to prevent sticking. Turn the risen dough onto the surface and gently deflate it by pressing down with your fingertips. Shape the dough into a round loaf, about 8 inches in diameter, by pulling the edges toward the center and sealing the seam firmly. This round shape mimics the traditional Roman panis quadratus.
Place the shaped loaf on a parchment-lined baking sheet and cover it again with the damp towel. Allow it to rise for an additional 30-45 minutes until it has puffed slightly and feels firm to the touch. The second rise ensures proper oven spring and a well-developed crumb structure. Preheat your oven to 425°F during this final rise to ensure it's ready for baking.
Bake for Crispy Crust and Tender Crumb
Once the oven reaches 425°F, carefully transfer the loaf to the center rack. Bake for 25-30 minutes until the crust is deep golden brown and sounds hollow when tapped on the bottom. The bread should register an internal temperature of 190-200°F at its center, indicating proper doneness.
For an even crispier crust, I recommend finishing the bread under the broiler for 1-2 minutes at the end of baking. Watch closely to prevent burning. Remove from the oven and let the bread cool on a wire rack for at least 15 minutes before slicing—this allows the crumb to set and prevents a gummy texture. The resulting loaf should have a crisp, crackly exterior with a tender, slightly dense crumb that's perfect for dipping in olive oil or pairing with Roman-style dishes.
Pro Tips For Making Authentic Ancient Roman Bread
- Mix the Dough by Hand: Ancient Romans didn’t have stand mixers—neither should you for this bread. Knead the spelt and emmer blend vigorously for at least 10 minutes until it’s smooth and elastic. The gluten in these ancient grains needs work to develop properly, and skipping this step means a dense, gummy loaf.
- Use Lukewarm Water: Cold water shocks the dough, while hot water kills yeast activity. Aim for water that’s just warm to the touch (around 85°F/29°C)—like bathwater that feels cozy, not scalding. Your dough will rise more evenly, and the texture stays light.
- Skip the Overproofing: This dough rises fast—sometimes in as little as 2 hours. Watch it closely: when it’s puffed but still springs back slowly when poked, it’s ready. Leaving it too long makes the crumb gummy and the flavor flat. Set a timer if you’re distracted.
- Score Deeply Before Baking: A shallow slash won’t do. Use a razor blade or sharp knife to cut the dough at least ½ inch deep in a cross pattern. This lets steam escape properly, preventing a dense center and giving you that iconic Roman crust. Yes, it looks dramatic—but the results are worth it.
Essential equipment for great authentic ancient roman bread
Wood-Fired Oven Essentials
For the most authentic experience, a wood-fired oven is ideal—just like Roman bakers used. If you don’t have one, a cast-iron Dutch oven works beautifully. Place it on the middle rack of your oven and preheat to 425°F for 30 minutes to mimic the intense heat.
I love using a Lodge Pre-Seasoned Cast Iron Dutch Oven—it retains heat like a dream and creates that perfect crisp crust. 🔥
Dough Tools Matter
Roman bakers shaped dough by hand, but a few tools can help you achieve professional results. A wooden dough scraper (like the OXO Good Grips) makes handling sticky dough easier, while a bench scraper helps divide and shape the loaf. For kneading, your hands work best—just
Heat Control Tools
Controlling temperature is key to that signature Roman crust. A thermometer (I recommend the Thermoworks Smoke) lets you monitor your oven’s heat accurately. For wood-fired baking, a chimney starter (like the Victorinox) helps create a strong flame quickly. If using a home oven, a baking stone (placed on the lower rack) helps distribute heat evenly and mimics the radiant heat of a wood-fired oven.
Crust Enhancers
Semolina flour isn’t just for texture—it’s also a Roman trick for achieving that crispy crust. Dust your work surface and the top of the loaf with it before baking.
For extra crispiness, brush the baked loaf with a mix of 1 tbsp olive oil and ½ tsp water while still warm. A pastry brush (like the Westcott Stainless Steel) makes this easy. 🌾
Storage Solutions
To keep your bread fresh, store it in a linen or cotton bread bag (like the Breadtopper) at room temperature for up to 3 days. For longer storage, freeze the loaf in slices wrapped in parchment paper—reheat in a 350°F oven for 5-7 minutes to restore crispness.
A vacuum sealer (like the FoodSaver) works too, but linen breathes better for daily enjoyment.
Nutrition facts
Frequently asked questions
Why does this recipe use spelt flour instead of modern wheat?
Ancient Romans relied on spelt flour because it was the most widely available grain in their region. It produces a denser, nutty bread with a slightly chewy texture that matches historical accounts. Modern wheat flour lacks the same depth of flavor and structural integrity.
Can I make this bread without yeast?
Yes! Traditional Roman bread often used natural fermentation. Skip the yeast and let the dough rise for 12-24 hours at room temperature. The longer fermentation develops more complex flavors, but requires precise temperature control (ideally 75-80°F).
What's the best way to achieve that crispy Roman crust at home?
For maximum crispiness, use a cast-iron Dutch oven or baking stone. Preheat your oven to 425°F for 30 minutes before baking, then steam the oven by spraying water on the walls. Brush the baked loaf with olive oil while warm for extra shine and crunch.
How did Romans store their bread to keep it fresh?
Ancient Romans stored bread in cloth-lined baskets or ceramic jars to maintain freshness for several days. For modern storage, wrap cooled loaves in a linen towel and keep at room temperature for 3-4 days. Freeze slices for longer storage—reheat in a 350°F oven for 5 minutes.
What ingredients can I substitute if I can't find emmer wheat?
Replace emmer wheat with durum wheat flour or whole wheat flour in equal amounts. For best results, use 100% spelt flour if emmer wheat is unavailable. The texture will differ slightly but remain authentic. Avoid all-purpose flour—it lacks the necessary protein structure.