
Side Dishes
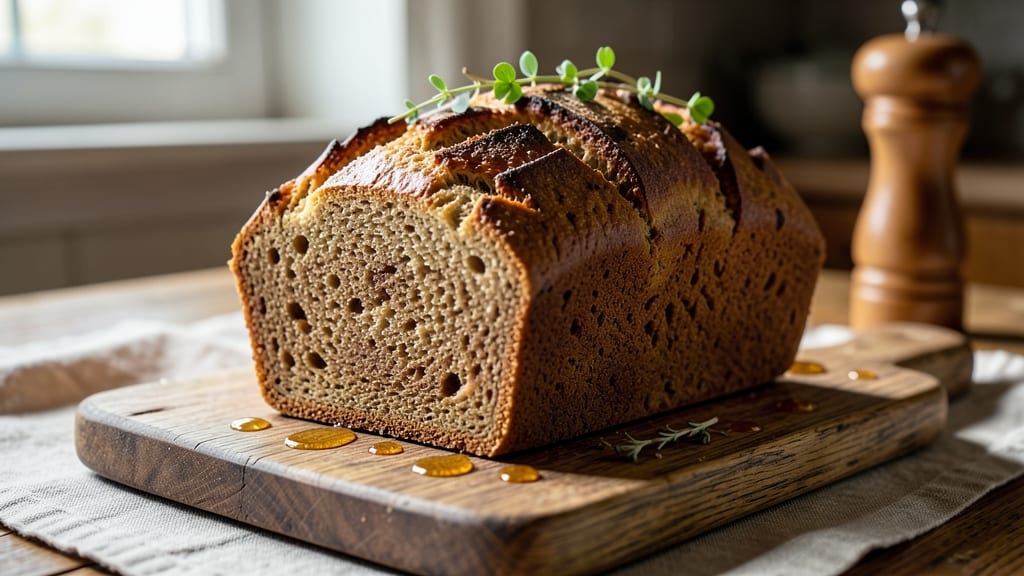
This apple cider yeast bread recipe transforms your kitchen into a cozy autumn bakery with its aromatic spice swirls and perfectly crispy crown. 🍂 The secret lies in the apple cider, which infuses the dough with deep, caramelized notes while keeping the texture tender yet sturdy—ideal for slicing into thick, hearty portions.
Unlike store-bought loaves, this recipe develops rich, complex flavors through slow fermentation, making every bite taste like a warm hug from a farmhouse kitchen.
The dough begins with a simple yeast activation, but the magic happens when you fold in the streusel swirl—a mix of brown sugar, cinnamon, and chopped nuts that caramelizes beautifully during baking. Kneading develops the gluten for that signature crispy crust, while proofing ensures a light, airy crumb.
The scoring technique isn’t just decorative; it directs the oven’s heat to create that coveted crackly top while preventing over-expansion.
By the time it emerges from the oven, you’ll have a loaf with a golden, shatteringly crispy crown and a tender interior threaded with sweet, spiced swirls.
The apple cider’s tangy depth lingers with every slice, making it perfect for slathering with butter, pairing with jam, or using as a sandwich loaf. This isn’t just bread—it’s a centerpiece for fall gatherings, where the aroma alone will have guests gathering around the table.
Whether you’re baking for a holiday feast or a quiet Sunday morning, this recipe delivers restaurant-quality results with minimal fuss. The dough can be mixed the night before, so all you’ll need to do on baking day is shape, proof, and bake.
Leftovers? They’ll disappear just as quickly as the first batch—trust me, this loaf is impossible to resist.
Ingredients for apple cider yeast bread
Apple cider, warm spices, and a crispy crown—this loaf brings autumn warmth to your table.
| Ingredient | Amount | Notes |
|---|---|---|
| Apple Cider 🍎 | ½ cup | Unpasteurized for best flavor |
| Active Dry Yeast 🍞 | 2 ¼ tsp | 1 packet or 7g |
| Warm Water 💧 | ½ cup | 110°F for yeast activation |
| All-Purpose Flour 🌾 | 4 cups | Plus 1 tbsp for dusting |
| Granulated Sugar 🍚 | ¼ cup | For yeast feeding |
| Salt 🧂 | 1 tsp | Kosher or sea salt |
| Unsalted Butter 🧈 | ½ cup | Cold, cubed for streusel |
| Light Brown Sugar 🍚 | ½ cup | Packed, for streusel |
| Ground Cinnamon 🌿 | 1 ½ tsp | Freshly ground preferred |
| Chopped Walnuts 🥜 | ¼ cup | Toasted for extra flavor |
| Large Egg 🥚 | 1 whole | Room temperature |
| Cornmeal 🌽 | ¼ cup | For bread pan coating |
| Coarse Sugar 🍚 | 2 tbsp | For sprinkling on top |
The apple cider is non-negotiable here—unpasteurized has the best flavor, and local orchard brands or Mott's work perfectly. If you can't find unpasteurized, pasteurized still adds depth, just not as much tang. For the yeast, check the expiration date—old yeast means weak rise. King Arthur or Bob's Red Mill flour gives the best texture, but any high-protein all-purpose works. Toast your walnuts for 3 minutes in a dry pan—it brings out their natural sweetness and crunch. The butter should be cold and cubed when mixing into the streusel, so it creates those perfect little pockets of flavor.
No apple cider? Substitute with 1/4 cup apple juice plus 1/4 cup water—it won’t be identical, but it’ll save you. Running low on walnuts? Pecans or almonds work too, just toast them first. The cinnamon is key—Penzeys or McCormick are my go-tos, but any ground cinnamon will do. For a nut-free version, swap walnuts for oats or extra brown sugar. The egg acts as a binder, but if you're avoiding it, 1 tbsp ground flaxseed mixed with 3 tbsp water works as a substitute (let it sit for 5 minutes to thicken). The cornmeal coating isn’t just for looks—it prevents sticking and adds a subtle crunch to the crust.
Mix the dough the night before and let it ferment in the fridge—this slow rise develops deeper flavor. Shape the loaf and proof it at room temperature for 1-1.5 hours until it’s about doubled in size. For the crispy crown, score the dough with a razor blade just before baking—this directs the oven’s heat and prevents over-expansion. The loaf keeps well at room temperature for 2 days, but it’s best enjoyed fresh. Slice it thick—this bread is all about those hearty portions. Store leftovers in a bread bag or wrapped in foil to keep it soft. Freezes beautifully for up to 3 months—just thaw at room temperature before serving.
Why You'll Love This Recipe
- Pantry Staples Only: I swear by this recipe because it uses what’s already in my cupboard—no fancy swaps. That warm apple cider? It’s the secret that replaces milk and oil, giving the dough just the right chew without extra shopping.
- Spiced Warmth in Every Bite: The caramel notes from the apple cider linger like a hug—sweet but not cloying, with that deep yeasty richness. Honestly, it’s the kind of bread that makes you slow down and savor each slice.
- Weeknight & Weekend Star: Toss together the dough in the morning, let it rise while you’re at work, and bake it fresh for dinner. Or, make a double batch on Sunday—it’s perfect for sandwiches, toast, or even crumbled over oatmeal.
- Budget-Friendly Comfort: A loaf costs me pennies but feels like a treat. The yeast and flour stretch far, and that apple cider? Often cheaper than buying specialty bread mixes. Plus, it keeps for days—no wasted crust.
Step-by-step instructions for apple cider yeast bread
Here's how to craft a rustic loaf with a crispy crown and spiced streusel swirls.
👨🍳 Step 1: Activate the Yeast with Apple Cider
In a small bowl, whisk together the 0.5 cup apple cider and 2.25 tsp active dry yeast. Let it sit for 5-10 minutes until bubbly and frothy. You'll see tiny bubbles forming on the surface—this means your yeast is alive and ready to work. If it doesn't bubble, your yeast might be dead or the water too hot.
While waiting, warm the 0.5 cup warm water to 110°F—it should feel like bathwater, not hot enough to burn your finger. The apple cider adds subtle sweetness and depth to the bread, but it also helps activate the yeast more gently than plain water would. This step sets the foundation for flavor and rise.
👨🍳 Step 2: Mix the Dough and Knead Until Smooth
In a large bowl, combine 4 cups all-purpose flour, 0.25 cup granulated sugar, and 1 tsp salt. Make a well in the center and pour in the yeast mixture and the 1 whole large egg. Using a wooden spoon, stir until everything comes together into a shaggy dough.
Turn the dough onto a lightly floured surface and knead for 8-10 minutes until smooth and elastic. You'll know it's ready when it springs back slowly when poked. Real talk: this is where the magic happens—kneading develops gluten, which gives your bread that perfect chewy texture. If it feels sticky, add flour 1 tablespoon at a time until it's workable.
🥘 Step 3: Create the Streusel Swirl and Shape the Loaf
In a separate bowl, mix the 0.5 cup cold unsalted butter, 0.5 cup light brown sugar, 1.5 tsp ground cinnamon, and 0.25 cup chopped walnuts until crumbly. Roll the dough into a 12x16-inch rectangle on a floured surface and spread it evenly. Sprinkle the streusel mixture evenly over the dough, leaving a ½-inch border around the edges.
Starting from the long side, tightly roll the dough into a log, sealing the seam. This creates those beautiful swirls of spiced streusel throughout the loaf. For extra crispiness, I like to tuck the ends under the roll before shaping. The butter in the streusel will melt during baking, creating pockets of flavor and moisture.
🔥 Step 4: Proof and Shape for a Crispy Crown
Place the loaf seam-side down in a greased 9x5-inch loaf pan lined with parchment paper. Cover with a damp towel and let it rise in a warm place for 1-1.5 hours until it's puffy and nearly doubled in size. You'll see the dough expand and fill the pan—this is when the bread develops its airy texture.
While it proofs, preheat your oven to 375°F. Sprinkle the top with 2 tbsp coarse sugar and dust the pan with 0.25 cup cornmeal for that classic rustic look. The sugar will caramelize during baking, creating a beautiful crispy crown. For extra crunch, I sometimes sprinkle a little more cornmeal on top right before baking.
🔥 Step 5: Bake to Golden Perfection
Bake for 45-50 minutes until the top is deep golden brown and the internal temperature reaches 190-200°F. You'll smell that incredible apple cider aroma filling your kitchen—this is the moment you've been waiting for. Tap the loaf gently; it should sound hollow when done.
Let the bread cool in the pan for 10 minutes before transferring to a wire rack. This resting period prevents it from falling apart when you slice it. The streusel swirls should be warm and gooey inside, with a crispy exterior that's perfect for dipping in coffee or butter. Slice while still warm for the best texture!
Pro Tips For Making Apple Cider Yeast Bread
- STRAIN THE CIDER: That cloudy sediment in store-bought apple cider? It’ll weigh down your dough and make it gummy. Strain it through a fine-mesh sieve or cheesecloth into a clean bowl first—takes two minutes and makes a world of difference in texture.
- TEST THE YEAST FIRST: Skip this at your peril. Mix 1 packet yeast with ¼ cup warm water (110°F) and 1 tsp sugar, then wait 5–10 minutes. If it doesn’t foam, your yeast is dead—no amount of kneading will fix it. Grab fresh yeast or hold off on baking.
- KNEAD JUST ENOUGH: Overworking the dough after adding apple cider turns it tough. Stop when it springs back slowly (about 8–10 minutes by hand) and looks smooth but still slightly sticky. More kneading won’t make it better—it’ll just tire you out.
- USE A DAMP TOWEL: Apple cider dough sticks like glue. Wet a kitchen towel, drape it over the bowl, and tuck the edges under. It keeps the surface from drying out while rising, so you won’t waste time fighting sticky dough later. (Pro move: Chill the dough overnight under this towel for even better flavor.)
Dietary considerations for this apple cider yeast bread
Gluten-Free Adaptation
Swap the all-purpose flour for a 1:1 gluten-free baking flour blend like King Arthur Measure for Measure or Bob's Red Mill 1-to-1. Add 1 tsp xanthan gum to help bind the dough—gluten-free flours lack the natural elasticity that creates that perfect chewy texture.
The yeast activation and proofing times may take 10-15% longer, so be patient. I’ve found that gluten-free versions benefit from an extra 15 minutes of kneading to develop structure. 🌾
Vegan Substitutions
Replace the egg with 1 tbsp ground flaxseed mixed with 3 tbsp water, letting it thicken for 5 minutes before using. For butter in the streusel, use ½ cup vegan butter (like Miyoko’s or Earth Balance) or coconut oil.
The apple cider remains dairy-free, but check your yeast package—some brands use animal products. I’ve had great success with Red Star Vegetarian Yeast for this recipe. 🥛
Lower Sugar Options
Reduce the granulated sugar in the dough by 25% (to 0.1875 cup) and cut the brown sugar in the streusel to 0.375 cup.
Use a sugar substitute like erythritol or monk fruit sweetener for half the amount—these won’t caramelize like sugar, so the crust will be less crispy but still flavorful. The apple cider’s natural sweetness helps balance the reduction. For extra richness, add ½ tsp vanilla extract to the dough. 🍯
Nut-Free Version
Omit the walnuts entirely and replace them with ¼ cup rolled oats or extra brown sugar for texture. If you want crunch without nuts, toast ¼ cup pepitas (pumpkin seeds) for 3 minutes in a dry pan—they add a nutty flavor without the allergens.
The streusel will still hold together, though it’ll be slightly softer. I’ve also had success using shredded coconut for a tropical twist. 🥜
Allergen-Friendly Tips
For a soy-free version, ensure your yeast is soy-free (like Saf-Instant Yeast). If avoiding dairy, use vegan butter and check flour blends for milk additives. For egg-free bakers, the flaxseed egg works perfectly—just don’t overmix after adding it, or the dough may become gummy.
Always double-check labels, especially on pre-made flour blends and yeast packets. A little extra attention here makes this bread safe for almost everyone! 🛡️
Nutrition facts
Frequently asked questions
Can I use pasteurized apple cider instead of unpasteurized?
Yes, but you’ll lose some of the deep, tangy flavor that unpasteurized cider provides. Pasteurized will still work—just expect a slightly sweeter, less complex taste. For best results, use a high-quality pasteurized brand like Mott's or a local orchard variety.
Why did my bread turn out dense instead of light and airy?
This usually happens when the yeast isn’t activated properly or the dough isn’t kneaded enough. Make sure your water is 110°F (not too hot) and your yeast is fresh. Also, knead for the full 8-10 minutes—this develops gluten for that perfect rise. If your kitchen is cold, proof the dough in a warm spot (like near the oven with the light on).
How can I make this bread nut-free?
Simply omit the walnuts and replace them with ¼ cup rolled oats or extra brown sugar for texture. For crunch, toast ¼ cup pepitas (pumpkin seeds) for 3 minutes in a dry pan—they add a nutty flavor without allergens. The streusel will still hold together, though it’ll be slightly softer.
Can I make this bread without a loaf pan?
Shape the dough into a free-form round or oval and place it on a parchment-lined baking sheet. Brush the top with melted butter and sprinkle with coarse sugar for a rustic look. Bake at 375°F for 35-40 minutes until golden. The crust will be thicker, but the interior will still be tender and flavorful.
How long will this bread stay fresh?
At room temperature, it stays fresh for 2-3 days when wrapped in a bread bag or foil. For longer storage, freeze the cooled loaf for up to 3 months. Thaw overnight at room temperature or warm in a 300°F oven for 10 minutes to restore freshness. The streusel swirls taste best when slightly warm!