
Side Dishes
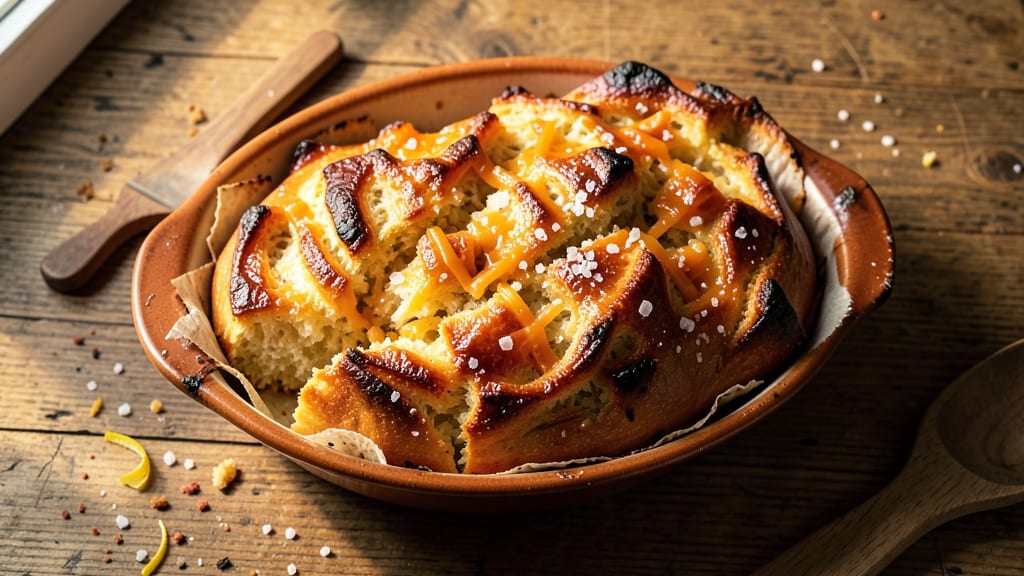
This artisan cheddar cheese bread recipe delivers a golden crust and sharp cheddar pulls that make every bite irresistible. The secret lies in balancing rich, aged cheddar with a buttery dough that develops a crisp exterior while staying tender inside.
I’ve perfected this recipe over years of baking, ensuring the cheese melts just enough to create pockets of gooey goodness without overwhelming the bread’s structure.
The dough starts with a foolproof kneading technique that develops gluten for a light crumb, while the cheese is folded in at the perfect moment to prevent sinking. Proofing at room temperature ensures even rising, and a high-heat bake creates that signature crackly crust.
This isn’t just a side dish—it’s a standalone masterpiece that pairs beautifully with soups, stews, or even butter and jam.
What sets this apart is the sharp cheddar’s ability to cut through the bread’s richness, creating a harmony of textures and flavors. The crust stays crisp for hours, while the interior remains soft and slightly chewy—a balance that’s hard to achieve.
Whether you’re serving it warm from the oven or toasted the next day, this bread will become a staple in your kitchen.
For extra depth, consider adding a sprinkle of garlic powder or fresh herbs to the dough before baking. The result? A restaurant-quality bread that’s simple enough for weeknight dinners but impressive enough for guests. Let’s get started—your taste buds will thank you.
Ingredients for artisan cheddar cheese bread
Four cups flour, two cups sharp cheddar—this is where golden crust meets gooey cheese pulls.
| Ingredient | Amount | Notes |
|---|---|---|
| All-Purpose Flour 🌾 | 4 cups | Sifted for even texture |
| Sharp Cheddar Cheese 🧀 | 2 cups | Aged 12+ months, shredded |
| Instant Yeast 🍞 | ½ tsp | Or active dry (use 1 tsp) |
| Granulated Sugar 🍚 | 1 tbsp | For yeast activation |
| Salt 🧂 | 1 tsp | Diamond Crystal preferred |
| Unsalted Butter 🧈 | ½ cup | Cold, cubed for dough |
| Warm Water 💧 | 1 ¼ cups | 110°F for yeast activation |
| Milk 🥛 | ¼ cup | Warmed, for tenderness |
| Garlic Powder 🧄 | ½ tsp | Optional for depth |
| Egg 🥚 | 1 whole | For egg wash |
| Cornmeal 🌽 | ¼ cup | For dusting baking sheet |
| Coarse Sea Salt 🧂 | ½ tsp | For sprinkling crust |
The cheddar makes or breaks this. Sharp, aged cheddar (like Cabot or Tillamook) is non-negotiable—it needs that tangy bite to cut through the buttery richness. Pre-shredded? No way—it gets clumpy. Grab a block, shred it yourself, and store it in the freezer. For the flour, King Arthur or Gold Medal work best—they develop gluten beautifully. The butter? Plugrá or Land O’Lakes unsalted—full-fat only, trust me on this. Keep everything cold until the dough comes together, or you’ll end up with a sticky mess.
No sharp cheddar? Extra sharp cheddar at half the amount works in a pinch, but it won’t be the same. Running low on butter? Vegetable shortening keeps the crust crisp, though it lacks flavor. For a garlic kick, swap half the milk for garlic-infused oil—just warm it with a crushed clove. The egg wash is optional, but it gives that restaurant-quality sheen. Pro tip: Save the egg shells—rinse and dry them for future baking. And if your dough feels too sticky, add flour 1 tbsp at a time—don’t overdo it or the crust will toughen.
This bread stays fresh for 3 days wrapped in a clean towel at room temperature, but honestly? It’s best the day it’s baked. For leftovers, toast until crispy—it’s basically a free upgrade. Freezes beautifully too: slice, wrap tightly, and it’ll keep for 3 months. Reheat slices in a 350°F oven for 5-7 minutes to revive that crispy crust. And if you’ve got extra dough? Make dinner rolls—same recipe, different shape. Just sayin’.
Why You'll Love This Recipe
- No-Knead Magic: That sharp cheddar folded right into the dough? It melts into the crust like a dream—no fancy techniques, just mix, rest, and bake. Even if you’re not a bread baker, the yeast does the heavy lifting while you sip your coffee.
- Cheese Pulls Hard: Honestly, the moment that golden crust cracks open and you see the gooey, stretchy cheese inside? It’s like Christmas morning. That tangy sharp cheddar turns this from bread to event—no fancy cheese board needed.
- Weeknight Workhorse: I’ve used this for breakfast (toasted with butter), lunch (sandwiches for the kids), and even dinner (grilled with soup). The dough keeps 3 days in the fridge, and the leftovers? Toast them until crispy—problem solved.
- Budget Stretch: Sharp cheddar’s a pantry staple, and flour lasts forever. For under $5, I feed my family dinner rolls and sandwich bread. Between us, this is how I stretch grocery money without sacrificing flavor—no sad, store-bought loaves here.
Step-by-step instructions for artisan cheddar cheese bread
Here's how to create a golden crust with sharp cheddar pulling through every bite.
Activate the Yeast and Mix the Dough
In a large bowl, combine the 1.25 cups warm water, 1 tbsp granulated sugar, and 0.5 tsp instant yeast. Let it sit for 5-10 minutes until frothy—this confirms your yeast is active. If nothing happens after 10 minutes, your yeast might be dead, and you'll need to start over.
In a separate bowl, whisk together the 4 cups all-purpose flour, 1 tsp salt, and 0.5 tsp garlic powder. Add the yeast mixture, 0.25 cup milk, and 1 whole egg to the dry ingredients. Mix with a wooden spoon until a shaggy dough forms. This dough will be sticky, so don't be tempted to add extra flour—it needs moisture for that tender crumb.
Knead and Incorporate the Cheddar
Turn the dough onto a lightly floured surface and knead for 5-7 minutes until smooth and elastic. The dough should feel slightly tacky but not sticky. If it's too dry, add 1 tsp warm water at a time until it comes together.
Cut the 0.5 cup unsalted butter into small cubes and work them into the dough by hand, pressing and folding until fully incorporated. Then, crumble the 2 cups sharp cheddar cheese into the dough and knead until evenly distributed. The cheese should be visible in small chunks throughout—this ensures those signature pull-apart strands. Shape the dough into a round loaf and place it in a lightly greased bowl.
First Rise and Shape the Loaf
Cover the bowl with a damp towel and let the dough rise in a warm place for 1-1.5 hours, or until it has doubled in size. You'll know it's ready when you poke it gently and the indentation stays—this means the yeast is working properly.
Once risen, turn the dough onto a floured surface and gently shape it into a rectangular loaf, about 10x6 inches. Fold the edges toward the center to create a tight seal, then place it seam-side up on a parchment-lined baking sheet. Brush the top with the 1 whole egg (beaten lightly with 1 tbsp water for a wash) and sprinkle evenly with 0.25 cup cornmeal and 0.5 tsp coarse sea salt. This creates that signature crusty texture and adds flavor.
Proof and Bake to Perfection
Let the shaped loaf rise again for 30-45 minutes until it has puffed slightly and the top looks domed. Preheat your oven to 375°F while the loaf proofs—this ensures it goes straight into a hot oven for maximum rise and browning.
Bake for 25-30 minutes until the bread is deep golden brown and sounds hollow when tapped on the bottom. The internal temperature should reach 190-200°F. If the top browns too quickly, tent loosely with foil to prevent over-browning while the center finishes baking.
Cool and Serve
Remove the bread from the oven and let it cool on a wire rack for 10-15 minutes. This resting time allows the steam to escape, preventing a gummy texture. The cheese should be soft and pullable, with a crisp crust that contrasts beautifully with the tender crumb.
Slice while still warm for the best experience—each bite should deliver melty, sharp cheddar strands with a satisfying chew. Serve with soup or enjoy as-is for a comforting snack. The garlic powder adds subtle depth, but you can omit it if you prefer a classic cheddar flavor. Store leftovers wrapped in a clean towel to keep them fresh for up to 3 days.
Pro Tips For Making Artisan Cheddar Cheese Bread
- GRATE THE CHEESE FINE: I learned this the hard way—big cheddar chunks melt unevenly and leave you with a bread that’s more "surprise texture" than "artisan." Use a box grater (not a food processor, which shreds too loosely) and aim for pieces no bigger than a sesame seed. If you’re lazy, pulse the cheese in a food processor, but don’t go full shred—think "fine snow," not "wood chips."
- LET THE DOUGH RISE UNTIL IT DOUBLES: This isn’t a suggestion—it’s the thing that matters most. That first rise (after mixing) should take 1–1.5 hours, not 30 minutes. If your kitchen’s drafty, cover it with a damp towel. The dough should spring back slowly when poked (not snap back like a rubber band). Rushing this step = dense, chewy bread. Your future self will thank you.
- SKIP THE EXTRA SALT IN THE DOUGH: Sharp cheddar is already packed with salt, and adding more to the dough can make the bread taste flat. Taste the grated cheese first—if it’s aggressively salty, cut the dough’s salt by half. You’ll still need some salt (for structure and flavor), but trust the cheese to carry the punch. (Yes, even if you’re impatient like me.)
- BAKE UNTIL THE CRUST STOPS CRACKLING: The bread’s done when the internal temp hits 190°F and the crust stops making that loud crack-crack noise when you tap it. Pull it out too soon, and the cheese will ooze like a sad fondue. Too late? It’ll dry out. Aim for 15–18 minutes at 375°F, then check with a thermometer—don’t guess. (Your oven’s hot spots will lie to you.)
Storing and reheating your leftovers
Room-Temp Storage
Keep your cheddar cheese bread fresh at room temperature by wrapping it in a clean kitchen towel or parchment paper—this traps moisture and prevents drying. Place it in a basket or bread box (or a brown paper bag if you're in a pinch) for up to 3 days.
The towel method is my go-to because it mimics bakery conditions, keeping the crust crisp and the interior soft. Avoid plastic bags—they trap steam and turn the bread gummy. 🌾
Freezer-Friendly Slices
For long-term storage, slice the bread while still warm and freeze individual pieces between parchment paper in a ziplock freezer bag. This prevents freezer burn and lets you grab just what you need.
Thaw slices at room temperature for 10-15 minutes, then reheat in a 350°F oven for 5-7 minutes to restore that golden crust. Pro tip: Label bags with the date—this bread stays good for 3 months in the freezer without losing its pull-apart magic. ❄️
Reheating Secrets
Revive stale bread with a stovetop trick: Place slices in a dry skillet over medium heat for 1-2 minutes per side until crispy.
For oven reheating, wrap slices in foil and bake at 350°F for 5 minutes, then unwrap and finish under the broiler for 1-2 minutes to crisp the top. Microwave reheating? Skip it—it turns the crust soggy. The key is dry heat to restore that satisfying crunch. 🔥
Crust Revival Hacks
If your bread’s crust loses its crunch, brush it with melted butter and broil for 1-2 minutes until golden. For extra flavor, sprinkle with garlic powder or everything bagel seasoning before broiling.
Another trick: Toast slices in a toaster oven at 375°F for 3-4 minutes—this mimics fresh-from-the-oven texture. The goal is to recreate that Maillard reaction without overcooking the interior. 💡
Make-Ahead Dough
Prep the dough the night before and refrigerate it overnight for easier handling—the cold slows fermentation, giving you more control over the rise. Shape and proof the loaf in the morning, then bake as directed.
This works especially well for weekend baking or when you’re short on time. Just let the dough sit at room temperature for 30 minutes before shaping to make it more pliable. 📅
Cheese Pull Test
After reheating, test the cheese by pulling a strand—it should stretch 3-4 inches before snapping, with a creamy, melty center. If the cheese stays hard, reheat longer or try wrapping slices in damp paper towels before reheating to restore moisture.
The perfect pull comes from sharp cheddar and proper baking temps—never compromise on these! 🧀
Nutrition facts
Frequently asked questions
Can I substitute sharp cheddar with another cheese?
While sharp cheddar is ideal, you can use extra sharp cheddar (halve the amount) or Pepper Jack for a mild kick. Avoid mild cheddar—it lacks the tangy bite that balances the buttery dough. For a dairy-free option, try nutritional yeast (1 tbsp) mixed with 1 cup shredded mozzarella, but the flavor won’t be identical.
Why did my bread sink in the middle?
This usually happens if the dough overproofed or the oven wasn’t hot enough. Check your yeast first—if it didn’t foam after 10 minutes, it’s dead. Also, ensure your oven reaches 375°F before baking. For extra stability, chill the shaped loaf for 30 minutes before final proofing to slow fermentation.
How do I make this into dinner rolls?
Divide the dough into 8 equal pieces (about 1.5 oz each) and roll into balls. Place on a baking sheet with 2 inches between them, cover, and let rise for 45-60 minutes. Bake at 375°F for 15-18 minutes until golden. Brush with egg wash and sprinkle with coarse salt for extra flavor.
Can I add herbs or spices beyond garlic powder?
Try 1 tsp dried rosemary or thyme for earthy depth, or ½ tsp smoked paprika for a subtle BBQ note. For heat, add ½ tsp cayenne or 1 tbsp chopped jalapeños (remove seeds first). Just don’t exceed 1 tsp total of any additional spices to avoid overpowering the cheddar.
What’s the best way to serve this bread?
Slice warm and serve with butter and jam, alongside tomato soup, or as a side for grilled meats. For a gourmet touch, pair it with aged cheddar and honey or whipped feta and chives. The crisp crust holds up perfectly to dipping—just avoid soggy toppings like creamy sauces.