
Side Dishes
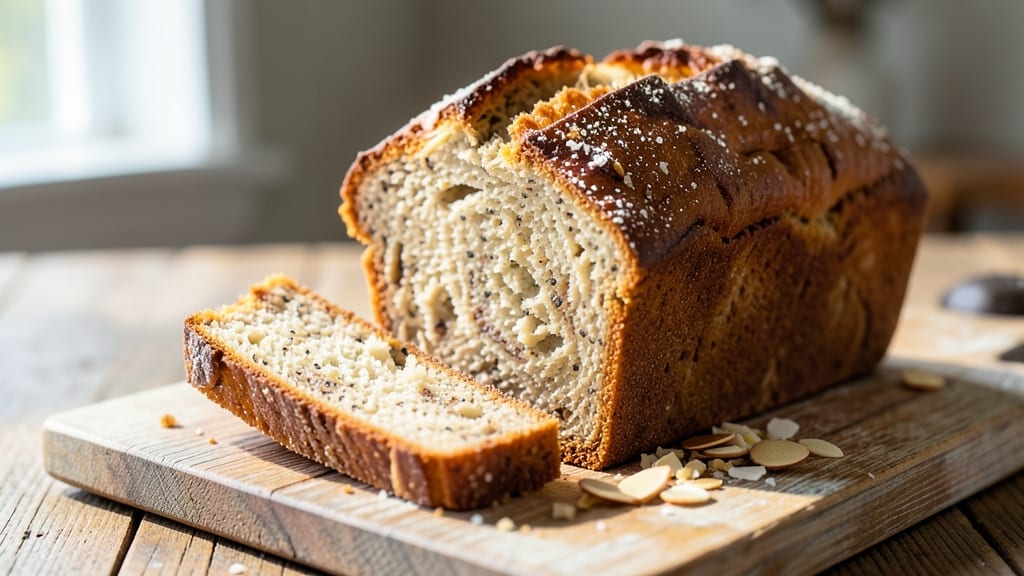
This almond and coconut flour bread recipe delivers a nutty-crunchy loaf that rivals traditional wheat bread—without a single gluten grain. 💛 The secret lies in balancing these two flours for a texture that's both tender and satisfying, with a subtle sweetness from the coconut.
I've perfected this recipe through countless test batches, ensuring it stays moist and flavorful for days.
The beauty of this recipe is its versatility—it's naturally gluten-free, grain-free, and vegan-friendly, making it perfect for those with dietary restrictions. The almond flour adds richness and structure, while the coconut flour provides that signature crunch.
What sets this apart is the addition of psyllium husk powder, which mimics gluten's binding properties for a bread that holds together beautifully.
By the time it emerges from the oven, you'll have a golden-brown loaf with a crisp exterior and a soft, slightly dense crumb. The nutty aroma fills your kitchen, and each slice offers a satisfying bite—ideal for toast, sandwiches, or simply enjoyed with butter.
This bread proves that gluten-free doesn't mean sacrificing texture or taste.
Whether you're baking for a special occasion or simply want a healthier alternative, this recipe delivers restaurant-quality results at home. The best part? It's foolproof, with clear instructions that even beginners can follow. Let's get started!
Ingredients for almond and coconut flour bread
Balanced flours and plant-based binders create a loaf with restaurant-quality texture and nutty depth.
| Ingredient | Amount | Notes |
|---|---|---|
| Almond Flour 🌰 | 2 ½ cups | Finely ground, unsweetened preferred |
| Coconut Flour 🥥 | ½ cup | Unsweetened, sifted before measuring |
| Psyllium Husk Powder 🌿 | 1 tbsp | Pure, unsweetened variety |
| Flaxseed Meal 🌾 | 3 tbsp | Ground flaxseeds for binding |
| Coconut Sugar 🍯 | ¼ cup | Or maple syrup for liquid sweetener |
| Baking Soda 🧂 | ½ tsp | Pure, aluminum-free |
| Salt 🧂 | ½ tsp | Fine sea salt preferred |
| Extra-Virgin Olive Oil 🫒 | ½ cup | Cold-pressed for best flavor |
| Unsweetened Almond Milk 🥛 | ¾ cup | Room temperature preferred |
| Apple Cider Vinegar 🍏 | 1 tbsp | For flaxseed activation |
| Vanilla Extract 🌸 | 1 tsp | Pure vanilla preferred |
| Ground Cinnamon 🌿 | ½ tsp | Freshly ground for warmth |
| Coconut Oil 🥥 | 2 tbsp | Melted for greasing pan |
The almond flour is the backbone of this recipe—Bob's Red Mill or Anthony's Goods are excellent brands for their fine grind. Coconut flour absorbs moisture aggressively, so measure it after sifting to avoid over-densifying the batter. Psyllium husk is non-negotiable for gluten-free binding; Frontier Co-op sells it in bulk at reasonable prices. For the flaxseed meal, Bob's Red Mill again delivers consistent quality. If you're using coconut sugar, Wholesome! Sweetener brand is my go-to for its fine texture, though maple syrup works beautifully if you prefer liquid sweetener. The baking soda should be aluminum-free—check the label as some brands contain anti-caking agents that can affect flavor.
No almond flour? Cashew flour works as a 1:1 substitute, though the texture will be slightly denser. Coconut flour shortages? Tapioca starch at half the amount mimics some of its binding properties, though the crumb won't be identical. Swapping coconut sugar for maple syrup requires adjusting liquid content—reduce the almond milk by 2 tbsp to compensate. For the flaxseed mixture, chia seeds can replace flax at the same ratio, though they yield a slightly firmer texture. The apple cider vinegar is essential for activating the flax—Bragg is a reliable brand, but any raw, unfiltered vinegar works. If you're sensitive to cinnamon's heat, reduce to ¼ tsp or omit entirely, though it enhances the bread's natural sweetness beautifully.
This dough is highly perishable—prepare it fresh for optimal results. The almond milk and flax mixture should sit for 5 minutes before combining to fully activate the binder. For storage, wrap the baked loaf in parchment paper, then place in an airtight container. It stays fresh for 3 days at room temperature or 1 week refrigerated. For longer storage, slice and freeze portions—reheat in a toaster or oven for 2-3 minutes to restore crispness. The coconut oil for greasing should be melted but not hot—just warm enough to coat the pan evenly, preventing sticking without compromising texture.
Why You'll Love This Recipe
- I’ll be real: almond flour isn’t cheap, but this recipe stretches way further than regular bread. The coconut flour and psyllium husk powder make it dense enough to last in the fridge for days, and you can freeze slices for toast on demand. Less waste, more value—exactly what I need.
- No Mixer Needed: I swear by this recipe because it’s actually a dump-and-stir affair. The psyllium husk powder does all the heavy lifting—no kneading, no waiting for gluten to develop, just toss everything in a bowl, let it hydrate for 10 minutes, and you’re golden.
- Nutty-Sweet Magic: Honestly, the combo of toasted almond flour and coconut sugar gives this bread a rich, caramel-like depth that’s way more interesting than your average loaf. The flaxseed meal adds a subtle earthiness that ties it all together—like a gourmet muffin but in bread form.
- Weeknight & Picnic Hero: Between us, this bread is my go-to for both lazy mornings and packed lunches. Toast it for breakfast, slice it for sandwiches, or even crumble it over yogurt—it holds up like a champ. (Yes, even on a Tuesday night when you’re too tired to think.)
Step-by-step instructions for almond and coconut flour bread
This gluten-free loaf requires precise technique but delivers exceptional texture and flavor.
👨🍳 Step 1: Activate the Flaxseed and Prepare the Wet Ingredients
In a small bowl, combine the 3 tbsp flaxseed meal with the 0.75 cup unsweetened almond milk and 1 tbsp apple cider vinegar. Stir vigorously and let sit for 10 minutes—this creates a gel-like binder that mimics gluten's structure. You'll see the mixture thicken noticeably as the flaxseeds absorb liquid.
In a separate large bowl, whisk together the 0.5 cup extra-virgin olive oil, 0.25 cup coconut sugar, 1 tsp vanilla extract, and 0.5 tsp ground cinnamon until fully combined. The oil should emulsify with the sugar, creating a smooth, homogenous base. This step ensures even distribution of flavor throughout the bread.
👨🍳 Step 2: Combine Dry Ingredients and Mix Thoroughly
Sift the 2.5 cups almond flour and 0.5 cup coconut flour together into a medium bowl. Add the 1 tbsp psyllium husk powder, 0.5 tsp baking soda, and 0.5 tsp salt, then whisk to eliminate any lumps. The psyllium husk is crucial here—it provides structure that gluten-free flours lack. Don't skip sifting the coconut flour, as it's dense and absorbs moisture unevenly.
Gradually add the dry ingredients to the wet mixture, stirring with a spatula until just combined. Avoid overmixing—you want a thick, sticky batter with visible streaks of flour. Here's the thing: this dough will be much thicker than traditional bread dough, but that's normal. The activated flaxseed gel and psyllium work together to create the right consistency for proper rise and texture.
🍳 Step 3: Prepare the Loaf Pan and Fold in the Activated Flaxseed
Generously grease an 8x4-inch loaf pan with 2 tbsp melted coconut oil, then dust lightly with almond flour to prevent sticking. Tap the pan on the counter to remove any excess flour that might interfere with the bread's texture.
Pour the batter into the prepared pan and smooth the top with a spatula. Gently fold the activated flaxseed mixture into the batter, ensuring even distribution. Tap the pan firmly on the counter 3-4 times to eliminate air pockets and help the batter settle evenly. This step is critical for preventing cracks and ensuring uniform rise during baking.
🔥 Step 4: Bake at Low Temperature for Even Cooking
Preheat your oven to 325°F—this lower temperature prevents over-browning while allowing the bread to cook through evenly. Place the loaf pan on the center rack and bake for 50-55 minutes, until the top is golden brown and a toothpick inserted in the center comes out clean. The bread should spring back slightly when pressed gently.
I know it seems counterintuitive to bake at such a low temperature, but gluten-free breads require gentle heat to develop properly. If you're tempted to increase the temperature, resist—this will result in a dense, dry loaf. The longer bake time at lower heat ensures the coconut flour absorbs moisture properly and the almond flour develops its characteristic nutty flavor.
⏰ Step 5: Cool and Slice for Perfect Texture
Remove the bread from the oven and let it cool in the pan for 10 minutes, then transfer to a wire rack to cool completely for at least 1 hour. This cooling period is essential—rushing it will result in a gummy texture as the flours absorb residual moisture.
Slice the bread carefully with a serrated knife, as gluten-free breads can be more delicate. Each slice should reveal a moist crumb with visible flecks of almond flour and a slightly crisp exterior. Store wrapped in the refrigerator for up to 5 days or freeze for longer storage. The bread will keep better when slightly stale, so toast slices before serving for maximum freshness.
Pro Tips For Making Almond And Coconut Flour Bread
- Mix the Psyllium Early: The psyllium husk powder is your bread’s glue—don’t wait until the last minute to add it. Stir it into the wet ingredients (like your flaxseed egg wash) and let it sit for 5 minutes before mixing with the dry flours. This gives it time to fully hydrate and bind, or you’ll end up with a dense, crumbly loaf instead of something that holds together.
- Sift the Coconut Flour: Coconut flour is a nightmare if it clumps. Sift it twice—once before measuring and once again when combining with almond flour. I learned this the hard way after a batch turned out like a brick. A fine-mesh sieve makes all the difference, and don’t skip it just because it’s "fine enough."
- Bake at 325°F, Not Higher: This isn’t regular bread—almond and coconut flour burn fast. Cranking the oven to 350°F or higher will give you a charred exterior before the center sets. Stick to 325°F and bake for 5-10 minutes longer than you think you need. The crust will firm up as it cools, but the inside stays tender.
- Add Extra Fat if Dry: Almond flour absorbs moisture like a sponge, and coconut flour soaks it up even faster. If your dough looks too dry (or cracks when shaping), toss in 1 extra tablespoon of melted coconut oil or butter. It’s not cheating—it’s insurance for a bread that doesn’t fall apart at the first slice.
Essential equipment for great almond and coconut flour bread
Must-Have Mixing Tools
For this recipe, a stainless steel mixing bowl (like the OXO Good Grips 5-cup bowl) is essential—it prevents the almond flour from sticking to plastic. I also recommend a silicone spatula (such as EcoTools) to scrape every last bit of batter from the bowl.
A fine-mesh sieve (like Norpro) is critical for sifting the coconut flour to avoid clumps that ruin texture. 🌰
Precision Measuring
Accuracy is key with gluten-free baking, so invest in a digital kitchen scale (I love the OXO Good Grips) for measuring flours by weight—this eliminates packing issues. For liquids, a liquid measuring cup with clear markings (like Pyrex) ensures you hit the 0.75 cup almond milk mark precisely.
The psyllium husk powder should be measured with a small scoop—never a spoon, as it can pack unevenly.
Baking Essentials
A loaf pan (I use USA Pan) with a non-stick coating is ideal, but if yours isn't, grease it thoroughly with coconut oil (not butter, as it can burn). For even heat distribution, place a baking stone (like Lodge) on the lower rack to prevent soggy bottoms.
A toothpick is your best tool for checking doneness—insert it in the center, and if it comes out clean, your bread is ready. 🔥
Cooling and Storage
After baking, transfer your loaf to a wire cooling rack (I prefer OXO's) to prevent moisture buildup. For long-term storage, use glass airtight containers (like Le Parfait) to maintain freshness.
A serrated bread knife (such as Mercer Culinary) is a must for clean slices—regular knives crush gluten-free breads. For reheating, a toaster with a bagel setting works best to restore crispness.
Optional Upgrades
If you bake frequently, a stand mixer (like KitchenAid) with the paddle attachment saves time mixing the dense batter. For extra flavor, a cinnamon stick infused in the olive oil while heating adds depth.
A food processor (such as Ninja) can help grind almonds into flour if you're starting from scratch. These upgrades aren't mandatory, but they make the process smoother. ✨
Nutrition facts
Frequently asked questions
Why does this bread need psyllium husk powder?
Psyllium husk powder acts as a gluten substitute by creating a gel-like structure when hydrated. This mimics gluten's binding properties, giving your bread proper rise and structure. Without it, the loaf would crumble and lack the satisfying chew of traditional bread. Think of it as the secret ingredient that makes gluten-free baking possible!
Can I make this bread without coconut flour?
Yes, but the texture will change significantly. Replace the 0.5 cup coconut flour with 0.5 cup tapioca starch or 0.25 cup arrowroot powder for better moisture retention. The crumb will be less dense, but the bread will still hold together. For a closer match, add 1 extra tbsp flaxseed meal to compensate for lost binding.
How do I fix a dense or gummy texture?
Most likely, your bread didn't cool properly or was overmixed. Always let it cool 1 full hour before slicing—this prevents gummy slices. For dense bread, try reducing the almond milk by 2 tbsp and increasing the olive oil by 1 tbsp next time. Also ensure your oven is properly calibrated using an oven thermometer.
Can I add seeds or nuts to this recipe?
Try adding ¼ cup chopped walnuts or 2 tbsp sunflower seeds to the batter for extra crunch. Fold them in during the final mixing stage. For seeds, toast them lightly first to enhance flavor. Just be aware that nuts/seeds will make the bread denser, so consider reducing the coconut flour by 1 tbsp if needed.
Why does my bread crack on top?
Cracking usually happens from uneven heat distribution or air pockets. Tap the pan firmly 3-4 times on the counter after pouring the batter to eliminate air bubbles. For even baking, place a baking stone on the lower rack. If cracks persist, try baking at 300°F for 5 minutes longer—this allows the top to set before fully cooking through.